Tuesday, March 25, 2014

Diamond in the rough

I had decided to do something with a different shape for the April PCAGOE (Polymer Clay Artists Guild of Etsy) challenge.  The theme this month is "containers".  I had this wooden form in the shape of a hexagon that tapers to a point (the shape of the bottom of my piece).  Something in the shape reminded me of a faceted diamond and thus the wheels went spinning! 


My first job was to cover the wooden pyramid with translucent white clay.  That was then covered with gradients of black to translucent white cut into triangular shapes to give the feel of light reflecting on the facets of a stone. 


The bottom part, having been cured twice, was finished when I set to work on the top.  I had figured if I covered just the widest part of the wooden form up only part of the way, this would create the walls of my lid and should sit easily on top of the base, but how to get the flat piece on the top of the lid?  Well, I just happened to have a big Fat Daddio's hexagon cutter which I used to first determine how far up the wooden form the lid walls needed to come and then cut out a flat piece of translucent white clay.  After curing both the lid walls and the flat hexagon, I glued the two together.  Because I wanted the lid to sit securely in place, I needed to build up a lip inside the lid's mouth, so I did that in the next baking and added another layer of translucent to give more strength to the lid.  After another curing, I then mapped out and placed layers of black to translucent white value in triangle and polyhedron shapes to mimic light refracting off the facets of a stone.


After curing a final time, I sanded and polished for hours.  I was almost afraid I wouldn't make the deadline, but I squeeked it in with an hour and a half to spare! The metal holder was something I hadn't originally planned, but when I had considered this piece laying on it's side and the potential of the lid falling off from the angle which it had to sit, I decided only yesterday to go to my local thrift store.  It seems that whenever I am in need of something specific, serendipity or my fairy god mother, just makes it appear at my thrift store.  I'm quite lucky in that regard.  I had wanted something gold.  I think this piece had once belonged to a copper coffee carafe, it is an aged copper metal (close enough!).  And the hole and three support curves were perfect for my 6 sided geometrical shape!  

While the piece doesn't really scream faceted stone, as the original thought had been, I do like the minimalist geometric shape of this piece and the design interest which the varying values in shapes lends to the whole.  If I were to recreate this piece I would construct the bottom in similar fashion to the top, with more solid values instead of gradations... lesson learned.
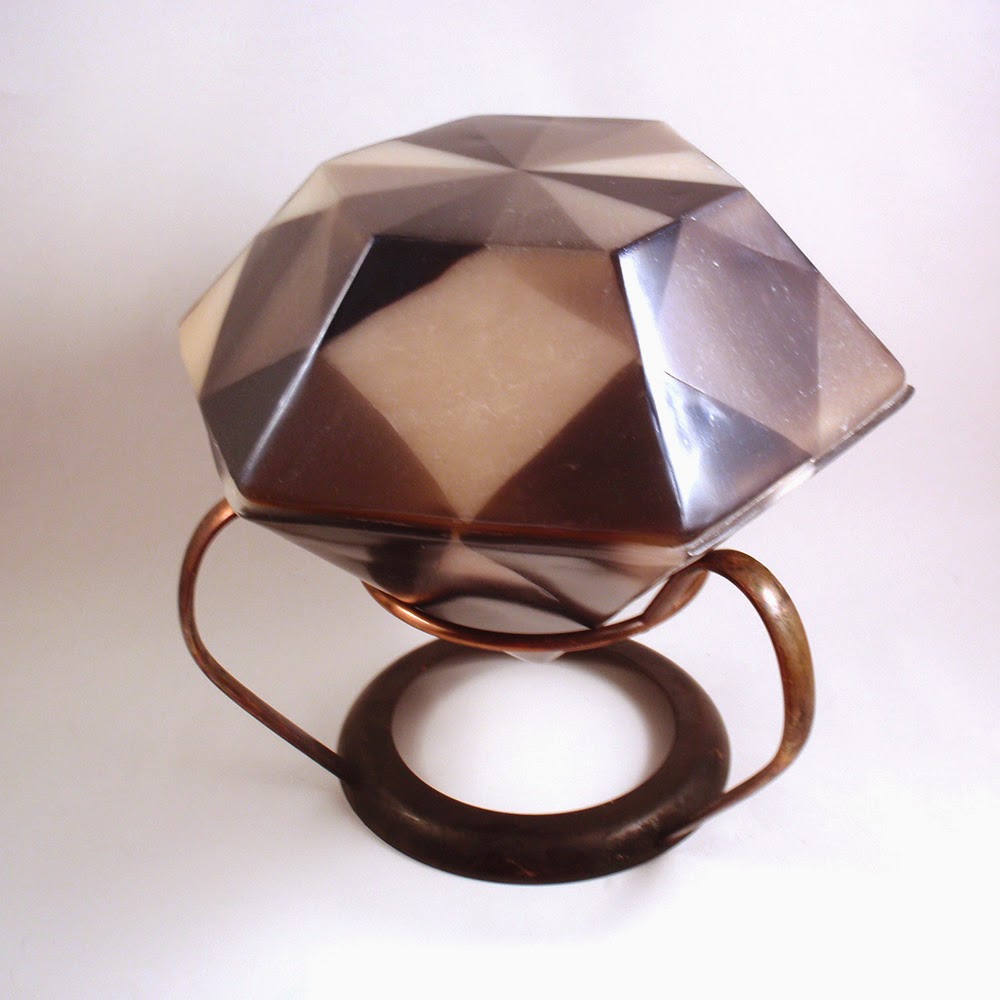

Another interesting thing with this piece, is that it can be flipped around to have the lid be the bottom and the bottom become the lid.  With this switch, it can even be simply set on a table without the metal holder.  I like it both ways, but think I prefer my originally intended positioning idea.  Though there are a few things I would change to remake this piece, I am quite happy with how it turned out.  I do think it's a deviation from my typical style, but that's just my opinion, others might see this as fitting right in with the rest of my work....  And I think it is an example of how my handwork is getting better with executing my crazy ideas.  I noticed with this piece, and with the last, that things just seem to fall in place and work out the way they were intended with little struggle, which has not always been the case in my history.  I know that in setting a goal for myself, to complete a full year of my guild's challenges (I'm now halfway into my 2nd year of continuous entries), it has strengthened my skills and honed my idea process, for which I am so grateful.


What about you?  Is there anything that you have done to sharpen your talents or hone your idea process?  If so, please share with me in the comments!  And let me know what you think of this new piece!

Voting for this challenge opens on April 1st and will run through April 7th at midnight.  I'll be sure to post again here, as a reminder!

Saturday, March 22, 2014

Soup mail!

I received soup in the mail yesterday!  That is, bead soup...  I signed up to do the 8th Bead Soup Blog Party which is organized by Lori Anderson of the Pretty Things Blog.

So the way this blog party works is that we are given a partner with whom we swap a gift of soup beads, and then we have a month or so to design something with the soup that we received.  The soup each person receives is totally unique and a complete surprise.  The soup must contain a focal, a clasp and complimenting beads.  Lori Anderson, and a few people who help her, processed all the requests to join the party and spent loads of time partnering everyone.  This was a Herculean task to say the least, as this blog party has something like 600 participants, and she endeavors to not repeat partnerships from past bead soup blog parties. 

Lori partnered me with a glass bead artist named Arlene Dean who blogs over at A Glass Bash.  Arlene sent me a beautiful package that I received yesterday (March 21st).  It was presented in a beautiful little box with a matching gift card:


I opened the box and I first laid eyes on this:


Beautiful blue silk sari ribbon and some great metal textural plates!  So fun!  I've always wanted to try some sari ribbon, so I was thrilled to see that!

Delving further into the box contents revealed some spools of wire and these organza bags:

...and upon opening those bags, here's the full soup:

I love the focal, it really reminds me of SPRING with those bright colors!  I think Arlene must have known that since I'm in PA, I've had a long winter and am craving spring!  And the clasp is darling, two interlocking butterflies.  Here's a close up of the focal, clasp and large green lampwork glass bead:

 The complimenting beads are a melange of various sorts, which also remind me of spring.  I really love the large moss agate beads and the bright pink dyed shell beads.  There are a couple various colors of freshwater pearls, a couple acrylic pearls and the rest are mostly faceted glass or czech beads.  Here's a close up of the bead mix:

I'm really looking forward to creating something with my soup.  The gears are churning already!  The reveal is on May 3rd, so you'll have to check back then to see what recipes I come up with to utilize these charming soup ingredients!

As this is a swap, I did indeed send my partner a package of soup.  It's likely at her house by now, but while it was in transit from my home to hers, she had to attend to some family matters elsewhere; so it awaits her opening.  Thus, I cannot share a photo of the soup I mixed for her until her eyes have seen it in person... I will tell you that I have a couple handmade components in her soup and it's all coordinated in a color combo that I love, but rarely use myself.  I will post photos of what I sent her as soon as I hear that she's opened the package, so check back soon to see what I concocted!

Have you joined in any of the past Bead Soup Blog Parties? If so, leave me a comment telling me about your experience, and remember to post a link so I can check out what you did with the soup!  If you haven't, leave me a comment anyway and tell me how you'd use my soup ingredients! ;)

Saturday, March 1, 2014

March Voting!


Time to vote! Go to the PCAGOE blog to cast your vote and be entered to win a prize! Voting is now open and will close on March 7th at midnight... 

Check out all the Eggcelent entries...

Google+

Saturday, February 22, 2014

Which came first...

...the chicken or the egg?  It was this age-old riddle that provided the base inspiration for my newest piece.


For my guild's (PCAGOE - Polymer Clay Artists Guild of Etsy) March 2014 challenge, the theme is eggs.  I had decided to finally make use of a glass egg-shaped container I purchased at one of my local thrift stores some time ago.  This cute little container was a frosted glass egg that was made up of 2 halves separated by a decorative wavy cut.  I had other ideas for this challenge initially; I thought perhaps I might do another cut and layered project; I tossed around ideas pertaining to "traditional" Easter egg themes.  And then one day, while working on my studio and moving a vintage glass hen dish (you know the ones, mine looks exactly like this)...  I thought of the old chicken/egg riddle, added that thought to my guild challenge, and the rest as they say, is history.


The hen is modeled from buff orpington hens (click the link to see a photo of one).  I first sculpted the hen with some yellow premo, knowing I would give her lots of texture and would alter the coloring with an antiquing coat of burnt sienna, white and black paints, to add lots of depth to the feathers.  Her comb, beak, ear lobes, eyes and wattle were all coated with a gloss finish to add a little shine to those parts, her feathers and the bottom basket half have no coating. Next came the sculpting of the grass and then constructing the basket with extruded strips.  I knew again that I would antique the basket with white to make it look like a white-washed Easter basket.  I then decided to add a little surprise to the inside of the box....


...some grass and some brown eggs.  The grass and eggs are not attached to the inside, so they could be removed and the box could be used as a trinket box.  I had originally intended to sell this piece, even after it was finished I had decided to list it to my etsy store.  But after my husband saw it, all that changed... he at first thought it was something I had bought.  When he realized that I had made it, he urged me to keep it, as he thinks it's one of my best pieces.  The dimensions of this piece are 4 1/2 inches tall by 3 inches wide.  The little eggs are about 3/4" tall by 5/8" wide.  Here are a few other views and close-up shots:

 
Top View
 
Tail View


I'm pretty happy with my little sculpture, not as happy as my husband seems to be, but happy enough....  What do you think about her? Leave me a comment below!  Voting for this challenge opens on March 1st and ends midnight March 7th.  I'll post a reminder here with a link to the guild blog when voting begins!

Wednesday, February 12, 2014

My Space

Where I create, my personal escape....
My studio reorganize is finally complete! I took about a 2 week hiatus in between the start and the finish of it.  The first 5 days I worked diligently on my 2 rooms and little else, but then I got distracted by creative sessions, a new fitness regimen, projects for family members and daily life.  Finally this week I decided that I needed to just get the job completed and document the event before I mess it all up again! ;)

So, on with the photos.  First I'll show you photos of the main (original) studio space.  For anyone who has already seen this space, it's not much changed.  And for those who prefer a minimal style, you'll wonder where the organization happened. I'd call my personal style "eclectic cram".  That is, filling every available nook and cranny with items one might some day need for a yet unknown project or for that idea I had 2 years ago that's still lurking in the back of my head...  So now that you're psychologically prepared here's the view...
 This is what you see immediately upon entering the room, straight ahead is my circa 1919 treadle sewing machine (and my first quilt).
And oh yes, that cabinet does have the machine in it, and yes it works! 


The view off to the right looks over my polymer work space and my jewelry assembly table
I'm so happy with my chair, it is newly reupholstered (actually, I reupholstered all the chairs in both my studio spaces).  Before, this one was a blah beige office-type fabric that had bits of polymer ground into the seat..hmm, wonder how that happened?!  I found this fun geometric vinyl on sale and recovered it just a few nights ago.

Here are a few shots of my polymer space, both of these desks and the book shelf are new to me. Luckily, the furnishings I chose for this room years ago happen to be a set that shows up quite often (nearly every time I go) at my local previously owned furniture store, a natural cherry Ethan Allen desk and bookshelf set which must have been a popular kids/student bedroom set at one time....(sorry the next photo got a bit grainy when I adjusted the deep shadows in photoshop)

Another recent thrift find, to outfit my new organize, was this rolling cart that stows away by the closet.  This piece is essential for my polymer work space, as it holds my vise and pasta machine.


Some close-up shots of my polymer area:


The lazy susan spice rack in the back corner of the desk is new, and perfect for holding all my liquid polymer so that I can keep it blended by just giving each bottle a turn every day.  Much of my tools and gadgets are also in a lazy susan caddy (between the light and the spice rack).  See those inchies on my plastic drawer container?  inspiration from my guild mates (plus my own extras) who attended the retreat last summer (here's a closer look at them):


All I have to do is whirl my desk chair around to face my jewelry assembly table:


And if the hubby wants to be close to me while I work, a chair that came from his beloved grandparent's house is waiting for him (once he clears off my childhood friends).  I positioned the chair so it looks out the window to our back yard:

That beautiful grannie square afghan on the back of the chair is older than me and my hubby, it was a wedding present to his grandparents... over 60 years ago.  This is such a peaceful spot, that some days he may have to fight me and my quilt-in-progress for access!  I've been working on this quilt for years...  only about 10 blocks left to quilt before I have a new living room blankie!

The next spot around the room is my electric sewing area:


Those baskets on the left hold my drop spindle and my wool batts.  One of my creative diversions during the reorganize was to spin some yarn on my drop spindle, so meditative...  Those things sticking in the corner on the back right are my inkle loom stacked on top of my rigid heddle loom, these will likely be moved to a wardrobe cabinet in the other studio space, as I don't like them shoved in the corner here.  Some close up shots of my sewing storage essentials:


I finally got that thread rack mounted on the wall, only took me a year since I got the idea to do so!

Here's a view of the back wall of shelves that holds some of my book/magazine and fat quarter storage:

My Recycled art desk:


I even made space in my closet to organize my fabric stash so that I can see and access everything easily without having to pull 20 things out of the closet to get to the one thing I want!

 So that's the original studio space still very cramped cause it's only a small bedroom size, but I can move around freely again, yay! 


 My newer space was a space originally built for my cats, a small room in the basement level of my home.   So, it's not a very big room, only about 12' by 9'.  Here's the view upon entering the door:

A shot of the desk at the window:


I cut and mounted all the window/door trim and baseboards, caulked and painted them.

More of my trim handiwork:

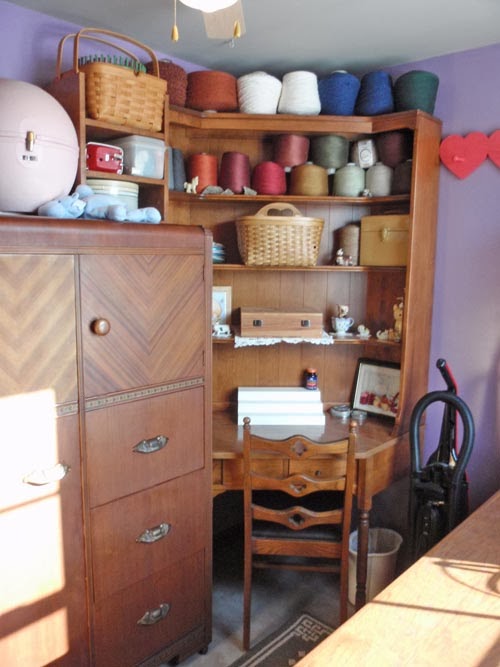
All the furniture (except the corner desk and bookshelf, and the shelf holding my weaving carpet warp thread that sits on top of the window desk) were thrift store finds.  The corner desk is another of that Ethan Allen set and was previously in the upstairs studio, but I moved it down to make room for the other pieces that make up my new polymer workspace.  This room houses all of my weaving threads, knitting and crochet supplies, tatting and candlewicking suppies, needlepoint kits, my drawing and professional art portfolios, silkscreen, printmaking, wood cutting and paper making supplies.  Plus, my kiln, my oven for baking polymer, my laminator, a stash of lamps that I plan to make polymer shades for, and my stash of plastic bags for fusing (for my recycled art).... lots of stuff for this little room!

I fell in love with the art deco wardrobe and had to have it when I saw the price was only $69 at our local thrift furniture store (and the inside of the long cabinet is cedar!):


My collection of yarn took up one entire filing cabinet (thanks to inheriting a great stash from my grandma-in-law).  These filing cabinets were Craig's List finds that cost me $35 total.  The only problem was that they didn't match, one was cream the other a dirty beige, so I bought some cans of yellow spray paint and voila!  The hubby hates the colors I chose for this room, but I love it!  I knew I'd need something bright and cheery, as every time I enter this room I miss my beloved kitty.  


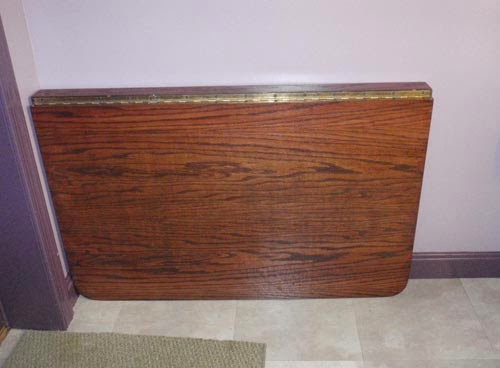
The room is nearly complete, I had my local "go-to" Amish furniture guy build me a drop leaf table to match the colors of the other furniture in this room.  This piece is too heavy for me to mount by myself.  I'll have to enlist the hubby's help for that job and so it waits for another day... and the window is in need of new dressing, a roman shade is in the planning stages for that purpose.

While I know some people will not understand one bit why I wrote this post, there are others out there who I know love seeing this stuff as much as I do.... there's a whole magazine/book line dedicated to the subject (called "Where Women Create").  I own the book and a couple of the magazines, and I love looking at other people's studio spaces.  I think too, it helps give one some idea of how artists work; as one of my guild mates phrased it when she posted a photo of her workspace on facebook, it's "where the magic happens".  I hope you enjoyed my little tour, I'd love to hear any comments you care to share!  And if you have a studio tour of your own, be sure to share it so I can have a peek at another magic making space! ;)

Addendum:
I meant to and then forgot to add this when I originally posted; here's my supervisor.  I often have to fight him for the cutting mat as this is where he likes to position himself while I'm working.  He even keeps that nylabone right next to that space, never takes it away from this general area, I guess that's his work in progress! :)

Saturday, February 1, 2014

Voting time!!


Please go vote here!
Voting ends 2/7/2014 midnight EST