Showing posts with label PCAGOE. Show all posts

Friday, August 5, 2016

August Vote (only 2 days left!)

So once again, time has slipped past me and I nearly forgot to post a reminder to for the PCAGOE monthly challenge! But, there are still 2 days left, so all is not lost! ;) If you follow this blog, you might remember from my last post that this month's theme is "Seaside", and as is usual, the participating members have all come up with completely unique and inspired pieces. Have a look at all of the loveliness:


I had a tough time choosing my 3 favorite pieces, and you might too! Please head over to the PCAGOE blog and cast your vote for your 3 favorite entries. Remember, one lucky voter is chosen every month to win a prize of their choosing, it could be you this month! Voting is open until midnight on August 7th, so head over to the PCAGOE blog now!

Friday, July 1, 2016

Flute Video & Voting Time!

It's time to vote for the PCAGOE July "Music" themed Challenge! Our guild members, as always, have come up with some inspiring entries. It's always so fun to see how each artist interprets the theme differently. Check out the 6 entries for this month:


You can vote for your 3 favorite entries at the PCAGOE blog. Voting is open until July 7th at midnight EST.


I was delighted to find the Sound Waves Flute that I made for this challenge featured on Polymer Clay Daily early this week! I was grateful too, that some of my favorite facebook pages shared this project (The Blue Bottle Tree, Strebe Designs & Paisley Lizard Designs). Many thanks to all the polymer people and friends who've shared my blog link to this project. Thanks too, for all of the wonderful comments and reactions! 

In the past week, since the original posting, I've received a lot of questions about the polymer covered flute, most of which were geared toward whether the flute actually plays, and whether the sound was affected by the addition of the polymer. So, I created a video contrasting the polymer flute to the uncovered flute. Forewarning: my flute playing is quite bad, since I do not play more than an occasional once or twice a year "pulling it out of the closet to see if I can still play" session.  It has been over 25 years since I played on a regular basis, so keep that in mind when you review the video. 


I don't really detect much difference between the sound of the covered flute and the sound of the uncovered flute.... it would be nice to hear the difference with a flautist who can play well, alas I have no such source. I hope this will adequately answer the questions that people have asked. Let me know what you think in the comments below. 

And don't forget to head over and vote for the PCAGOE challenge, one lucky voter wins a prize every month, it could be you this month!!

SaveSave

Sunday, June 5, 2016

June Vote!!

Goodness, I nearly missed out on posting a voting reminder here! I'm up to my eyeballs in strawberries and busy getting my house and gardens ready for summer, so I've been quite distracted from the computer these days. There are only 2 days left for the June PCAGOE challenge vote! The theme this month was "Quilled" Polymer, and we had a great variety of pieces among our participating members, see for yourself:


Voting is only open until the 7th of June, midnight EST... So head over to the PCAGOE blog and cast your vote for your 3 favorite pieces! Remember, one lucky voter is chosen every month, to win a prize... it could be YOU this month, but you have to vote for the chance! Thanks to everyone who takes a moment to vote!

Wednesday, May 25, 2016

Chaos: things don't always go as planned

Sometimes things just don't go as planned. I'm actually not surprised that my latest project didn't work out as intended. This is the busiest month of the year for me, as I'm knee-deep in lots of house-hold seasonal events: preparing and planting the garden (we have 2 large vegetable gardens); protecting, picking, cleaning, preparing and enjoying my strawberry harvest bounty; protecting the various fruit trees that are pinking or in immature fruit stage; and spring cleaning my house... all this piled on top of other "normal" life activities, obligations and chores. So my life is always a bit chaotic in the month of May, and this polymer project, though not intended to be, is a great reflection of that chaos.


Problem is, I had too many ideas for this project, and I tried to incorporate too many of them into this one piece. **sigh** I had feared that trying to cram too many ideas into one piece might indeed become disastrous, but I just had to try, didn't I? Why? Well, because I was dying to get all the ideas out there and just didn't want to wait. Lessons learned, often the hard way.


So my first idea was to create a portion of a sun image, with lots of flowing lines, but not the entire sun... here's a rough sketch of my first idea (the one I should have probably stuck with):


The PCAGOE theme for this month is "quilled" polymer, and this image would have worked well. Since I've done a couple other quilled pieces in the past, and wrote the tutorial article for The Polymer Arts magazine, I really wanted this to be something special. So I keep thinking about it and over thinking it. And then, I got the idea to upcycle some cds and to incorporate layers of quilling. Here's where I went terribly wrong. You see, this secondary idea did not follow the sketched image at all, it was something entirely different, and probably would have worked well had I stuck to that idea and the image I saw with it. But I didn't want to abandon that flowing sun image (chalk that up to having tons of rain in the past couple weeks), so I made the decision to combine the two (well, basically three) ideas into creating a layered and now full sun image (in order to incorporate the upcycled cd idea).  Oh, and then I had a fourth idea of using curled strips, as I've seen these used in quilled paper art lately.  (imagine a rolled eye animated emoticon here)

So, beyond being a bear to create this piece, with all the layers and trying to keep everything in place when cured (thanks to heat + gravity concerns that polymer artists know so well), the design just doesn't really work for me in the finished format. Well, I'm not sure it's finished either, I just basically ran out of time since I needed to photograph this with whatever remaining daylight I had at 8PM...  I may keep adding to it and trying to salvage something that I like from it.

Or, I might just cut it in half. When I cut the photos in half, I kind of like what happens... 


And... when I photoshop those halves into how I would hang them on the wall, I'm liking this effect even more.


...or...


So, I might be able to redeem the chaos after all... If I do, I'll be sure to post an update about it here on the blog.  What about you? Have you had life's chaos, calm or emotions subconsciously effect a project? What do you think of my chaotic work of art? What changes, do you think, would make this piece work better? I'd love to hear your thoughts, so leave me a comment below!

I'll post a reminder here on the blog for the challenge vote... as always, voting will open on the first of the month, and will be open from June 1st through June 7th. 

Monday, April 25, 2016

Spring has sprung

For a long time, I have been wanting to do an art vessel focused on negative space as the major design element. The theme for the May PCAGOE challenge is "negative space".  So, the PCAGOE challenge was the impetus that I needed to bring one of those ideas to life.


I had the idea to make a continuous spiral as the body of the vessel, combined with some side supports to buttress the spiral shape. I decided to try this with a method that Donna Greenberg generously shared on facebook. Donna used an epoxy clay as the under support for one of her wonderful openwork sculptures. If you're not familiar with Donna's work, you should definitely check her out. She is, without a doubt, one of my polymer heroes. You can find her facebook page here: https://www.facebook.com/Donna-Greenberg-Arts-151594531536806/?fref=ts


 I had some epoxy clay on hand so I decided to give Donna's method a try. Unfortunately, I initially only made the spiral, my thought was that I'd cover it with polymer before adding the side supports. Well... I wish I had realized that once separated from the form I was using to mold the spiral, it could potentially just become a great big epoxy clay slinky... needless to say, I didn't think of that. I guess I  assumed that the epoxy clay would be sturdy enough to hold it's own, but it wasn't, big epoxy slinky is indeed what I got.


I then had to put the slinky, I mean sculpted spiral, back on the mold form and try to add the side supports. When I finally was able to cover the epoxy clay with polymer it was a tricky undertaking. Difficult first, because the lower spindles of the spiral did not have a lot of space for my fingers to get in and smooth out the clay; and second, because the epoxy clay form (because I removed it from the base too soon) was a little wonky. Yes, that's a technical term. ;)


I decided to wrap strips of black polymer around the epoxy clay spiral shape of the base form. But because smoothing out the polymer was not going to happen easily with the limited space between the lower spiral spindles, I decided to use a technique that I used last year to make a necklace for myself... I took thin crochet thread and wrapped it around the raw polymer, then cured it and removed the thread, then backfilled the spaces that were created by the thread with some acrylic paint. Here's a photo of that necklace (and the sweater I wanted to match it to) that gave me the idea for how to treat the coil of the vessel:


This was a good idea, only thing was that with the necklace I was able to smooth out the clay, but with the vessel and the tight spaces, this wasn't feasible, so the vessel's finish is rougher than I would really prefer. Instead of acrylic paint I decided to use some peacock pearl colored Premo mixed with some LPC and thinner to make a paste that would be thin enough to fill the thread voids. I like the fact that this mixture clung to the cured polymer a bit more than the acrylic paint did, which I think gave it a little bit of a mokume gane feel.  Here's a shot of me holding it, so you can see the scale of the piece:


So, while I'm happy to see the idea come to life, I'm not really happy with this piece. I have another idea for how I might construct this next time, and I am considering doing a second iteration very soon. The thing I'm most unhappy about is how wonky the spiral got because of taking it off the form before adding epoxy supports on the side. I also don't like the fact that I had to texture everything because of how it was formed. My new idea for designing this will allow me to finish it smoothly. So, while I'm not completely happy, I am grateful for the lessons I learned and the inspiration I received while making this piece. What about you? Has there ever been a piece that you made which turned out less than you had hoped, but you were still grateful for the lessons learned? Did you do another iteration of that piece and better it with those gained insights? Tell me about it in the comments... and let me know what you think of my Spring Sprung vessel too!

Saturday, April 2, 2016

April Flowers Vote

It's time to vote! We had a great turn-out from our guild members, so many beautiful creations for the Flowers theme... it's tough to choose just 3 pieces, I wish I could vote for all of these lovely polymer clay creations! Check them out for yourself:


Head over to the PCAGOE site and vote for your top 3 favorite pieces! Remember, one lucky voter is chosen every month, to win a prize... it could be you! Voting is open from now until April 7th at midnight EST, so go there now and cast your votes!

Friday, March 25, 2016

Poppy Love

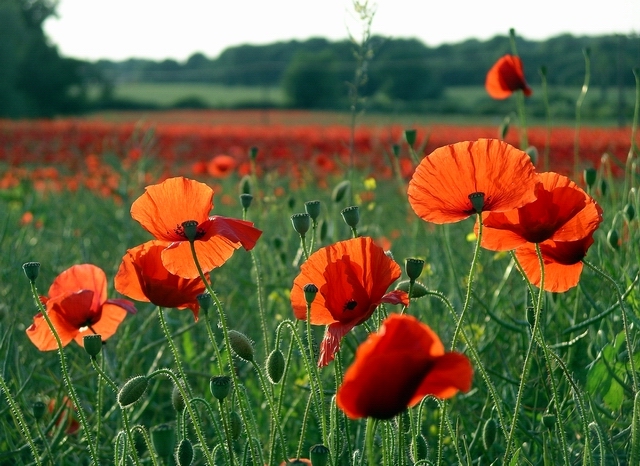
Turning to spring-like thoughts, the PCAGOE challenge theme for April 2016 is "flowers". To be sure, there are so many flowers that I love, hydrangeas, dogwood blooms, tulips, dahlias... the list could go on, seemingly ad infinitum. There is one frilly face that I especially look forward to seeing in the late spring/early summer days, that of the poppy. I don't have any of these lovelies in my own garden, but a neighbor's house across the street has them, and I am a yearly admirer. I also love the symbolism of using poppies to remember the deceased. It was this time last year when my neighbor with the poppies in her garden passed away. She was a friendly soul, who enjoyed sitting on her porch in the morning. We'd often had a chat standing in that garden of hers as she caught me enroute to or from my morning walk. So, with these things in mind, I decided upon the subject of poppies for my challenge project.

This is not my original photo, it was taken from the web. Image © Copyright Lynne Kirton  View image at: http://www.geograph.org.uk/photo/847625
One of the things that draws me to these flowers, and which I had hoped to translate in my piece, is the translucency of the petals.

When the subject was settled, I decided that I wanted to make this into a neck piece. The style of this piece was to be influenced by the work of a favorite ceramic artist, Carol Long Pottery. These two following pieces of Carol Long greatly influenced my neck piece, and they are some of my most favorite works by her:


I love the flowing lines, curvy shapes, the Art Nouveau feel, the pearly dots, Carol's work strikes a chord with my personal aesthetic. If you haven't heard of her before, please do check out her many other pieces at her website or on her facebook page.

So, with all these things in mind, I set to work sketching out a plan. I came up with a necklace design that I thought would fit my vision.


I decided that I wanted an asymmetrical design, that would not incorporate a clasp, i.e. it would wrap around the neck. For this, I decided that it would be built upon wire. My first step was to cut a piece of wire for the base and curve it into the basic shape which I envisioned for the neck piece (above).
Next up came extruding a hollow core tube of polymer, which would cover the wire.


Here you can see the extruded hollow tube. Brief plug for Lucy Clay tools: I love my Lucy Clay Czextruder, extruding is a breeze with this tool!
For the clay, I decided to use a blend of (mostly) Sculpey Souffle in the pistachio green color, with a bit of Premo light green pearl and some Premo translucent added to the mix. I've read that Souffle is strong but more flexible. Because the neck piece is designed to bend and wrap around the neck, the most strong yet flexible clay was desirable. It was not super easy to get the tubing to slide over the entire length of the wire, so I gave a coating of cornstarch to the wire and then it slid on easier. Because of the length, I had to approach the wire from both ends with the tubing and then join the two sides in the center. While this piece cured, I set to work on creating the poppies. I made 3 opened flowers, one upturned (side view) flower and two buds opening. For the petals, I chose to use Pardo translucent (because it is known to be the most translucent of all the brands) mixed with some mountain rose and watermelon colored Adirondak alcohol inks.


I cut the sheeted polymer with a round cutter and then I placed it between crepe paper (to mimic the veining of flower petals) and rolled it through the pasta machine. Above you can see the before disc laying on the red crepe paper, and the after flower petals laying to the left side of the crepe paper. Though these were quite thin, I still wanted the edges tapered as finely as possible, so I used my fingers to thin out the edges. For the bases of the flowers, I used a piece of wire which I had curled a loop onto the end (the loop ensures that the wire doesn't just slip out of the clay). I built up the center using the same green mix from the stem necklace base, then a disc of black, which I embossed with a starburst pattern. This starburst was then brushed with green/gold mica powder. A larger disc of black was placed on the wire to cup the center. This black disc was cut with a scissors to create the stamens of the poppy. Then, finally the petals were attached. After they were cured, I added a touch more of the watermelon red Adirondak ink, to the petals, to bring out the veining that the crepe paper imprinted onto the clay.


I wrapped the wire ends of the flowers around the previously cured necklace base. After this point, I was so enraptured with creating that I failed to take any further "in process" shots. After all of the flowers were mounted on the green base, it was time to make the intertwining vine. I wanted to mimic Carol Long's black flowing lines. So I took another piece of wire and extruded a hollow tube of Souffle black. This polymer tube, however, was a bit off center. So, I decided to give a twist to the polymer after it was on the wire, this would give strength to the thin areas. I think it was meant to be this way, because I like the fact that it looks more like a twig with this twist in the clay. After curing, I molded the black vine around the green base and the mounted flowers. At this point, I discovered that the flowers were too heavy for the necklace to keep it's desired shape around the neck. So I decided to reinforce the entire piece with a heavier gauge copper wire, and the back of the necklace was fully covered in black Souffle. The final design elements (also echoing Carol Long's style) were added by shaping some pearly dots and placing them sporadically around the perimeter of the piece. These were made with a Premo blend and a dusting of micro pearl mica. After the final cure, I was delighted with the design. Though not strictly adherent to my sketch, it's fairly close to my original vision.


I was especially pleased with the translucency of the flower petals, here's a detail shot of one of the poppy flowers:


A pleasant surprise was finding that I could twist the ends upon themselves for an alternative way to wear the neck piece, as seen below:


I also recently found out (after I had planned out the entire piece), in Christian symbolism, the poppy is seen as a metaphor - the red petals of the poppy symbolize the blood of a sacrificed Christ in the theme of resurrection and immortality. How perfect for a piece that is due to be unveiled to the world on Good Friday, and Easter weekend!

So, what's your opinion of my poppy neck piece? Do you have a favorite flower, or many favorite flowers? Does symbolism play a part in your choice of a favorite bloom? I'd love to hear your thoughts, so please consider leaving me a comment! ...and to those who celebrate this holiday, a Blessed Easter to you!

Wednesday, March 2, 2016

Time to vote for March Challenge

Yes, it's time to vote again! The March PCAGOE "Rings" themed challenge opened for voting yesterday... it will run through to March 7th at midnight EST. Look at all the lovely entries our members created this month:


I don't know about you, but it was tough for me to pick just 3 favorites! Head over to the PCAGOE blog to cast your vote... remember a lucky voter will be randomly chosen to win a prize, and that could be YOU! Go here to vote now! Thank you!!

Saturday, February 6, 2016

February Vote - Four Seasons

Wow, time has gotten away from me again! There's only 1 and a half days left to vote for this month's challenge! Here's a peek at the fun pieces my guild members and I have created for the four seasons theme:


Please head over the the PCAGOE blog and vote for your 3 favorite entries! One randomly selected voter will be chosen to win a free prize... it could be you this month! Voting will close for this challenge at midnight EST on February 7th, so hurry over to the PCAGOE page now!

Monday, January 25, 2016

Seasons of Change

I think most people on the east coast of USA are ready for a change of season! While I am a lover of all 4 seasons, I must admit that after shoveling the nearly 3 feet of snow, that was dumped on our area this past weekend, has left me not too keen for more of the "white stuff"! I do however love being snowed-in, especially when some of that time can be spent creating... as was the case this weekend. The project that I tackled was my guild's February challenge piece, of the theme "4 seasons (spring, summer, autumn, winter)".


I kept thinking of one of my favorite songs, by singer songwriter Nicole Nordeman... called Every Season (you can listen to it here). I love the word imagery Nicole uses in her song to describe and make us sense each season; and this featured in my thoughts while creating this challenge piece. I decided that I wanted to do a series of small wall hangings that depicted the growth changes of a plant from spring to winter. When brainstorming my ideas for this, I was excited about the concept of using the background of each canvas to depict the season's weather. Spring would have raindrops, summer would have hot blazing sunbeams, fall would have a colorful sunset sky, and winter would be a frosted coating of ice.


I created the backgrounds first, and had a lot of fun doing these! I used inks, washes and paints on the polymer for the winter and summer canvases. Spring raindrops were created using liquid Fimo drops, and autumn background is a simple skinner blend of sherbet sunset colors. The plant begins it's life as an unfurling and budding shoot in spring; leafs out and flowers in summer; changes leaf color, fruits into berries and begins dropping leaves in autumn; and finally is bare branches, picked over berries and decorated with snow for winter.


I created the canvases so that they can be hung separately, I like how this separateness allows for changing up the look of them and gives the owner flexibility in how they will be displayed.


I had a lot of fun coming up with various ways to shoot them with the camera, imagining different ways in which they could be hung on the wall, or how they might be stacked upon one another in a shop while waiting to be sold.


If you didn't notice, the winter background has a treatment of inks with mica, which makes the frosted background appear different at varying angles, you can get a good idea of that effect in the following 2 photos:


I'm not sure if I like them best grouped together in a bunch, like the first photo of this blog post, or displayed in a straight line... then there's the option of vertical or horizontal... 


I'm really quite pleased with the turn-out of these pieces, there's something about each one that I love, but overall I think that the summer one is my favorite. That's somewhat amusing to me, as I'm not a summer girl... while I love all the seasons, the sultry hot and humid heat of the summer is probably my least favorite time of year. Which one of these appeals to you most, and why? Does it correspond to your personal favorite season? I'd love to hear your thoughts on this project, please leave me a comment below! Voting for this challenge will open on February 1st at the PCAGOE blog. I'll post a reminder here when the vote is open!

Thursday, December 3, 2015

PCAGOE December "Re-do" Challenge Vote

It's time to vote for the PCAGOE December Challenge! Here are all of the entries for this month's "Re-do" theme:

Black and Red Drop Crystal Earrings No. 175 by Susan of 11BOLDstreet 
The "before" earrings were an entry for another PCAGOE Challenge. I was never really happy with the lower, translucent element. It seemed too dull and clunky by comparison with the upper focals. So, cut sleek slices from the same rich red as was used in the nugget beads, sanded, buffed them and added a sterling spiral, then re-hung as the new lower element - MUCH better!!

Fancy Soap Dispenser by Lisa of HiGirls 
This pink and blue soap dispenser just needed a little bit more. Gray trim with a white wash makes it a little more special. 
Emily by Marie Young of MarieYoungCreative
I loved "Emily" when I first created her 2 years ago, (see "Emily" Before) but my skills have improved so I decided to give her a makeover. I sanded her down and added a new layer of clay to give her features more definition (including sexy eyelids!). I also changed the color palette on her skin tones to provide more contrast.

Steampunk Fish by Freda of  FredaK
The first one was made in 2010 and was covered with extruder cane flowers and the other one is steampunk made last week.
Pod brooch re-do (revised design) by Beth of CreateMyWorldDesigns
I never quite liked the red outer rim of the original brooch, so for the December PCAGOE "re-do" challenge, I decided to change the original piece to something I'd like more, the black and silver outside is the result. To read more about this project, please visit my blog post: http://createmyworlddesigns.blogspot.com/2015/11/simple-brooch-re-do.html

To cast your vote for your 3 favorite entries, please go to the PCAGOE Blog. Remember, you could be our lucky prize winner, just for participating in the vote!