Showing posts with label necklace. Show all posts

Tuesday, March 13, 2018

Stretching and personal growth

It's been a while since I've written anything here on the blog. Part of that is because I haven't really devoted much time to working in the studio since last October. I chalk much of that up to a general malaise over what's happening to this country, which has deeply affected my motivation. Another part of the picture was simply the hustle and bustle of the holidays, paired with parental hospitalizations, plus household ailments from cold and flu season. And lastly, late in 2017, I decided to turn inward and focus on self-improvement. At the end of October, I began a routine (near daily) practice of yoga, which has both helped my physical and mental wellbeing. And early in 2018, I decided to tame the nutrition beast and begin the journey of losing the weight that has crept on over the years since I turned 35,  that magical number when easy weight loss suddenly became unobtainable despite a regular fitness routine. I'm happy to report, after 2 months of dedicated whole-food nutrition, I'm down 12 pounds so far, and feeling SO much healthier! This year is shaping up to be the year of "me", focusing on re-making myself into the healthiest version of me.

But, despite all of the aforementioned obstacles to feeding my muse, I haven't been totally out of my studio... Back in the fall I committed to participating in an online design course (that was scheduled to begin in December), which was offered by Christine Dumont and Donna Greenberg, through Voila! This course was specifically focused on jewelry design and the design principle of balance using symmetry and asymmetry. The course was held online, and was attended by a fantastic group of polymer artists. Though we each worked on interpreting the course material in our own ways, the sharing of assignments in our online group not only spurred conversation and camaraderie, but also generated a bounty of inspiration. If you've read my blog before, you already know about my artist crush on the work of Donna Greenberg from previous posts mentioning her. Christine Dumont's meticulous graphic style is mind-blowing to me, and she is another polymer artist who I have admired. I had the good fortune to meet both of these ladies in person last August at Synergy4. When the opportunity to take this online class presented itself, I knew immediately that this was an experience I shouldn't miss.

Now, the class was supposed to wrap up within a certain time period, but because of holiday, health and personal issues, some of us did not complete our final projects until sometime later. Our instructors have graciously kept the group open and kindly continue to provide a final assessment of our finished projects. This past week, I was happy to finally complete the piece that I designed as a result of this course experience.


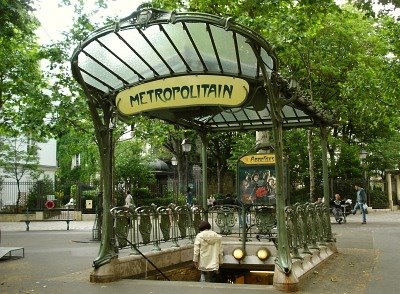
My jumping-off point for this piece was a necklace that I designed last year, with some of the cut polymer quilling strips. But I wanted to push the curvy swirls from that necklace into something more defined and sculpted. I've always been drawn to art nouveau styling and I wanted this new piece to reflect that design influence. My brain started to focus on the remembrance of the art nouveau styled metro stations in Paris. Perhaps this was because one of my best friends from my high school/college era, with whom I spent some time in Paris, was concurrently taking classes to reinvigorate his French. He and I enjoy reminiscing those years of our youth, and these metro stations in Paris have captivated me from the first time I saw them:


Here's the necklace that was my jumping-off point:

As you can see, my design changed quite drastically from the jumping-off point. You can see the stronger influence (including the color scheme) from the art nouveau metro station images. 

For those interested, below I will detail my full process for creating this piece. There will be more photos of the finished piece and a video which demonstrates the physical flexibility and position-ability of this piece. To start, I sketched out a few ideas. After pairing down features that didn't work, I chose the sketch in the next image to be the starting point. Also in the next image is the wire armature that I created, this wire armature is what allows the necklace to be customized by positioning it to contour the wearer's body. The wire armature is a 16 gauge aluminum wire. At the points where 2 wires meet, they are wound with a thin 28 gauge wire for joining.


The next step in the design process was a base layer of polymer. Keeping in mind that I wanted this piece to flex without breaking, I decided to go with a 50/50 blend of Cernit translucent and Bake 'n Bend white. Below is an image of the base layer before curing:


During curing of this base layer, some areas cracked. I'm not sure why this happened, perhaps from the heat of the wire, perhaps from the temperature of the oven... I filled in the cracks and re-cured until the entire piece was solid and ready for the decorative layers. 

I started by covering the piece in another blend of Cernit (this time in the Shiny green color) mixed with Bake 'n Bend in the green color. This blend was approximately a 75 percent (Cernit) to 25 percent (BnB). I decided that the best way to cover this piece was to start with the back. I wanted a line inscribed texture for the back and scratched that into the surface before curing. Here's a shot of the backside of the necklace:


 After the backside was sculpted, it went in for another cure. Once cured, I began the decorative layer on the front. I worked one half of the necklace at a time, as seen in the next photo, and cured the necklace after the first half was sculpted before starting the decorative layer on the second half. 


Once both sides were covered and sculpted to my liking and put in for the final curing, I added some antiquing using a matte polymer varnish with Paynes grey acrylic paint to the green areas. The gold rounds were treated to a dusting with gold mica while raw, but after curing they were then painted with a coating of a gloss polymer varnish, some metallic bronze paint was added to some of this varnish for painting around the bottoms of the rounds to give depth and simulate pearls. 


I am quite pleased with the finished piece. I've already worn it when we went to a concert on Saturday, and happily report that it is very comfortable to wear, which is an important factor. While this piece will likely remain in my permanent collection, I think there is a strong possibility that I will create other iterations of it in the future. 

This was my first time using Cernit. I chose this brand based on what I saw at Synergy4 in the pieces of Marie Segal (another polymer artist and kind soul who I admire). I was impressed with the strength and flexibility of the Cernit pieces that Marie brought to Synergy, many thanks go to Marie for discussing the benefits of Cernit with me. And thanks go to the generous Maria Alexandrou for demo-ing her flexible cuff tutorial at Synergy4, it was from that demo that I learned the possibilities of mixing bake n' bend with regular polymers to add flexibility. Speaking of which, here's that video showing the flexibility and position-ability of this piece: 


My experience with the Voila course was superb, and I plan to participate in the next class offering by Christine and Donna, which is listed on the website as TBA in 2018. I am already looking forward to how that class will stretch my design skills and knowledge even further. Another huge Thank You goes out to Christine, Donna, and all the other polymer artists who participated in this course. If you are a polymer artist, and you are wanting to push your design skills to another level, I highly recommend taking one of the upcoming Voila courses. Please do take some time to view Donna's and Christine's amazing work at their respective websites. 

If you're still with me (I know this was a long blog post), and if you have any comments or questions for me, I'd love to hear what you think about my latest creation.... Please do leave me a comment below! I do plan to get back to creating on a more regular basis; at the least, I hope it won't be another 5 months before I have something new to share. Until then, Thanks for stopping by my blog!
SaveSave

Thursday, January 26, 2017

Scrapping Around

This month's PCAGOE showcase theme was Minimalism. I had a couple different ideas floating around in my mind, but in the end I decided to use up some polymer scraps that have been sitting around my studio waiting to be put into action.

Because I'm an environmental advocate, I have a hard time throwing out things that I might someday use to create something. This can be tough to live with, especially as I generally must do a huge reorganize yearly just to keep track of what's what in my studio. And yes, I also save scraps of polymer that just didn't make the cut, or were actual cuts off of pieces that have since been finished. One half of the pieces I'll be showing in this blog post are an example of those kind of scraps, the other half of the pieces in this blog post use a completely different type of scrap. So, let's start with the first, the cured scraps...


These scrap strips of polymer that you see in the images above were cut off my polymer printing textured wall art that I made back in June of 2015. Here's a shot of those pieces:

Texture plate and Polymer Art Prints


I created those art prints with slabs of polymer that were then pressed with a handmade texture sheet and then colored. The pressing of the texture plate created edges that weren't quite even. So, once all three of the art prints were cured, I used an Xacto knife and a straight edge to make them perfect rectangles of the same size. The thin waste strips that were cut off the art prints still had the color and interesting textures, and I decided then to keep the strips and put them to use in some jewelry. These jewelry pieces were at the back of my mind for a long time, this guild showcase proved just the right moment to dust off that idea. I decided to bend some of the strips back onto themselves to create loops, and I grouped them together in mismatched groupings of loops and straight pieces, and one piece created with just the straight pieces. Each necklace is given a slightly different treatment for hanging, one is beaded, another wire wrapped silk sari, one has a single strand of aqua art yarn and the last one has 4 strands of the same aqua art yarn. Here are a couple close-ups of each piece in this collection:

Pick-up sticks necklace

Pick-up stick necklace pendant

Loopy necklace pendant

Loopy necklace
Simple loops necklace

Simple loops necklace pendant
Little loops necklace pendant

Little loops necklace

The next grouping of pieces I made with another kind of polymer scrap, these were raw scraps that came from the blades of my pasta machine. I took my pasta machine apart to clean my blades (I hadn't done that ever, so it was many years of thin polymer bits that had accumulated under the scraper blades of my machine). When I cleaned the blades there were these lovely pieces of multicolored polymer that I just had to save to use for something. Here's a photo of the pieces that came off the pasta machine blades, you can see one side is smooth and looks almost agate-like or resembles Fordite, and the other side has this interesting minuscule layered texture.


Smooth side of scraps

Textured side of scraps

I found the layered texture side so interesting that I used that side for all of the pieces that I created using these scraps. As of now, these pieces are unfinished... some of them will be brooches, some of them pendants and some of the will be convertible brooch/pendants.


I really had a lot of fun creating these pieces and using some of my polymer scrap stash. I think my favorite piece is the Loopy necklace, though... I'm looking forward to putting some time in the studio to finish up the pasta machine scrap pieces. I'm not sure if I've done Minimalism any justice, it's much harder to do Minimalist well than one would ever think! I always love to hear your thoughts on my work, so be a dear and tell me in the comments which piece is your favorite and why! Most of these pieces will eventually turn up in my CreateMyWorld etsy shop. I'm hoping to get the finished ones listed over this weekend. Be sure to check out all of the other Minimalist pieces that my guildmates have created at the PCAGOE Facebook page!

Monday, July 25, 2016

Sea Tossed Shell Necklace

It's been a rough month both physically and emotionally, for varied reasons. I nearly bailed on the PCAGOE challenge for August. I think I'm close to a 3 year streak for consecutive months of entries, so I really hated to miss a month. I haven't been in the studio since last month, and I could feel edginess setting in... this is never a good thing! Luckily, I manage to squeak in some time in the studio last night and today to come up with an entry. The challenge theme for August 2016 is "Beach".

When I originally thought about what I might do for this theme, I had planned to do a piece with a whelk shell and I intended to either film or take snapshots of the process. The plan was to embed a tutorial on my blogpost about the piece. Alas, with the lack of time and last minute studio work, I did not have a chance to do a video or photos, plus, the shell I decided to create is different from the whelk shell that I made for my She Sells Seashells Fairy House, and so the creating of it was another session of trial and error. 


Sometime yesterday I had resigned myself to skipping this challenge, because I didn't have any ideas for this shell piece... I simply wanted to make a seashell but didn't know how that shell would be used. Then I dug around in my stock of unassembled pieces, that I have in a bin, and found the 2 blue circle stacked beads that I had left over from my Cloudy with a Mix of Tyvek Necklace. These blue beads kind of reminded me of cascading waves, or even fish scales... and I started thinking about a necklace that would incorporate these beads and a shell pendant. I didn't want the shell to be too dimensional on the wearer, so I decided to create a worn shell, one that was tossed about and weathered by the ocean. I liked the idea of being able to see the various layers of the interior spiral. 


I set about making the shell with a blend of Premo translucent and Premo white. This piece was created in layers and various bakings, starting with the thin core first and working out to the outer layer last. After all the layers were attached and fully cured, I then used alcohol inks to add some coloring and and white acrylic paint to give a water-weathered impression to some of the areas The inner salmon layers were also treated to a thin layer of liquid pc and a shot with the heat gun to give a glossy look, similar to that of a real seashell.


Next I drilled a hole in the shell bead and strung it and the blue beads onto a strand of silk sari. The sari necklace is made to be tied to secure it, and so 2 blue glass beads were added to the ends to weigh them down. I think the sari strand gives a nice boho feel to the piece.


Excuse the last photo, of me modeling the necklace, I ran out of daylight and couldn't get the focus as sharp as I want. I'll try another day this week, to take a better photo and will update the post with the new photo as soon as I can...

Overall, I'll pretty happy with this quickie project. I do love how the shell turned out. I'm not convinced that I like it with the blue beads, at least not as much as I thought I would. Someday I hope to make a tutorial on how to make the whelk shells. If you're a polymer artist, is that something you'd be interested in learning? What do you think about the contrast between the blue beads and the shell pendant? Would you swap the blue beads for something else? Leave me a comment below and let me know what you think of my Sea Tossed Shell necklace.

Voting will open for this challenge on August 1st and will run through till August 7th at Midnight. As always, I'll try to post a reminder here on the blog!

Friday, March 25, 2016

Poppy Love

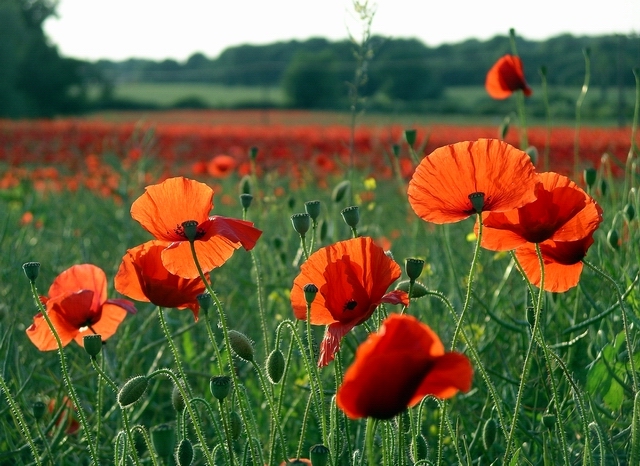
Turning to spring-like thoughts, the PCAGOE challenge theme for April 2016 is "flowers". To be sure, there are so many flowers that I love, hydrangeas, dogwood blooms, tulips, dahlias... the list could go on, seemingly ad infinitum. There is one frilly face that I especially look forward to seeing in the late spring/early summer days, that of the poppy. I don't have any of these lovelies in my own garden, but a neighbor's house across the street has them, and I am a yearly admirer. I also love the symbolism of using poppies to remember the deceased. It was this time last year when my neighbor with the poppies in her garden passed away. She was a friendly soul, who enjoyed sitting on her porch in the morning. We'd often had a chat standing in that garden of hers as she caught me enroute to or from my morning walk. So, with these things in mind, I decided upon the subject of poppies for my challenge project.

This is not my original photo, it was taken from the web. Image © Copyright Lynne Kirton  View image at: http://www.geograph.org.uk/photo/847625
One of the things that draws me to these flowers, and which I had hoped to translate in my piece, is the translucency of the petals.

When the subject was settled, I decided that I wanted to make this into a neck piece. The style of this piece was to be influenced by the work of a favorite ceramic artist, Carol Long Pottery. These two following pieces of Carol Long greatly influenced my neck piece, and they are some of my most favorite works by her:


I love the flowing lines, curvy shapes, the Art Nouveau feel, the pearly dots, Carol's work strikes a chord with my personal aesthetic. If you haven't heard of her before, please do check out her many other pieces at her website or on her facebook page.

So, with all these things in mind, I set to work sketching out a plan. I came up with a necklace design that I thought would fit my vision.


I decided that I wanted an asymmetrical design, that would not incorporate a clasp, i.e. it would wrap around the neck. For this, I decided that it would be built upon wire. My first step was to cut a piece of wire for the base and curve it into the basic shape which I envisioned for the neck piece (above).
Next up came extruding a hollow core tube of polymer, which would cover the wire.


Here you can see the extruded hollow tube. Brief plug for Lucy Clay tools: I love my Lucy Clay Czextruder, extruding is a breeze with this tool!
For the clay, I decided to use a blend of (mostly) Sculpey Souffle in the pistachio green color, with a bit of Premo light green pearl and some Premo translucent added to the mix. I've read that Souffle is strong but more flexible. Because the neck piece is designed to bend and wrap around the neck, the most strong yet flexible clay was desirable. It was not super easy to get the tubing to slide over the entire length of the wire, so I gave a coating of cornstarch to the wire and then it slid on easier. Because of the length, I had to approach the wire from both ends with the tubing and then join the two sides in the center. While this piece cured, I set to work on creating the poppies. I made 3 opened flowers, one upturned (side view) flower and two buds opening. For the petals, I chose to use Pardo translucent (because it is known to be the most translucent of all the brands) mixed with some mountain rose and watermelon colored Adirondak alcohol inks.


I cut the sheeted polymer with a round cutter and then I placed it between crepe paper (to mimic the veining of flower petals) and rolled it through the pasta machine. Above you can see the before disc laying on the red crepe paper, and the after flower petals laying to the left side of the crepe paper. Though these were quite thin, I still wanted the edges tapered as finely as possible, so I used my fingers to thin out the edges. For the bases of the flowers, I used a piece of wire which I had curled a loop onto the end (the loop ensures that the wire doesn't just slip out of the clay). I built up the center using the same green mix from the stem necklace base, then a disc of black, which I embossed with a starburst pattern. This starburst was then brushed with green/gold mica powder. A larger disc of black was placed on the wire to cup the center. This black disc was cut with a scissors to create the stamens of the poppy. Then, finally the petals were attached. After they were cured, I added a touch more of the watermelon red Adirondak ink, to the petals, to bring out the veining that the crepe paper imprinted onto the clay.


I wrapped the wire ends of the flowers around the previously cured necklace base. After this point, I was so enraptured with creating that I failed to take any further "in process" shots. After all of the flowers were mounted on the green base, it was time to make the intertwining vine. I wanted to mimic Carol Long's black flowing lines. So I took another piece of wire and extruded a hollow tube of Souffle black. This polymer tube, however, was a bit off center. So, I decided to give a twist to the polymer after it was on the wire, this would give strength to the thin areas. I think it was meant to be this way, because I like the fact that it looks more like a twig with this twist in the clay. After curing, I molded the black vine around the green base and the mounted flowers. At this point, I discovered that the flowers were too heavy for the necklace to keep it's desired shape around the neck. So I decided to reinforce the entire piece with a heavier gauge copper wire, and the back of the necklace was fully covered in black Souffle. The final design elements (also echoing Carol Long's style) were added by shaping some pearly dots and placing them sporadically around the perimeter of the piece. These were made with a Premo blend and a dusting of micro pearl mica. After the final cure, I was delighted with the design. Though not strictly adherent to my sketch, it's fairly close to my original vision.


I was especially pleased with the translucency of the flower petals, here's a detail shot of one of the poppy flowers:


A pleasant surprise was finding that I could twist the ends upon themselves for an alternative way to wear the neck piece, as seen below:


I also recently found out (after I had planned out the entire piece), in Christian symbolism, the poppy is seen as a metaphor - the red petals of the poppy symbolize the blood of a sacrificed Christ in the theme of resurrection and immortality. How perfect for a piece that is due to be unveiled to the world on Good Friday, and Easter weekend!

So, what's your opinion of my poppy neck piece? Do you have a favorite flower, or many favorite flowers? Does symbolism play a part in your choice of a favorite bloom? I'd love to hear your thoughts, so please consider leaving me a comment! ...and to those who celebrate this holiday, a Blessed Easter to you!