
The October challenge for my guild was "Creepy/Weird". I'm sure this post will upset some people with both the title and the subject of my sculpture, but once the initial thought began, it demanded to be made. Try as I might, I couldn't stop thinking about it. I guess it all started after the recent release of the tape recording of Trump on the bus with Billy Bush. The creepy factor of some pervert who thinks he can touch any woman he likes, just because he's famous, wouldn't go away. I kept thinking of him as an arrogant jerk, and that's where the rooster body came into play, the title just fell into place from there. Actually, there were a few different titles I was turning around in my brain (Look who wants to be in charge of the hen house, Chicken Little-hands, Chicken $h!t, Ameraucana Cock, The Cock's Disguise etc.) but the first one is the one that stuck. Because of the sensitive subject and title, I knew that I would not be posting it to my guild's group, as I don't want any negativity reflecting on the guild or my fellow members. I had hoped to finish it by the October 25th deadline. But, I decided to take my time with it and as a result, it took me a whole week to get the face sculpted to where I was somewhat satisfied with the likeness of Trump. Yes, critics will point out that it is not perfectly realistic, and I know that, I was trying my best to portray his identifying traits (a caricature of sorts): the oddly white skin around his eyes surrounded by a fake orange tanned face, his puffy wrinkled and squinty eyes, his multiple chins, that gaping mouth which seems to be captured so often in photos online, and of course, the wild hair and eyebrows.

Originally when I had pondered this challenge I had envisioned creating a funky/cool vessel with spikes and open spaces. I did not want to do a Trump sculpture, and honestly, I fought myself over this idea. I mean, who the heck want's a sculpture of Trump?!? (aside from the narcissist himself) Certainly NOT me! But once the idea came, it simply would not stop molesting my brain (pun intended). It didn't help my attitude seeing the people who defended his comments as locker-room banter, all over the internet. Then, one of my friends on facebook, actually another polymer artist, posed a question to her friends asking how many of her women friends had been sexually assaulted. It was stunning to see over just a 24 hour period that 160+ women were publicly acknowledging that they had been assaulted. And I found myself, for the first time ever, publicly acknowledging what happened to me with a simple yes. That was as brave as I could be.

Then there came the women who accused Trump of sexual assault, which were followed by denials from him, the campaign and from his followers. This included op-eds and memes which suggested that because these women had waited so long, their story must therefore be fabricated. This infuriated me and has made me just a little braver. You see, the first time I was sexually assaulted, it happened 40 years ago when I was a child. Other than the one who assaulted me (if that person remembers what they did), there is only one person who knows the details, my husband, the only person I could completely trust with something so grave, and it took me 25 years before I was able to share the story with that one solitary person. The details of my story will likely remain buried, because my husband will not break my trust and for me, the pain of bringing the truth to full light would far exceed the pain of concealing it all these years and for the rest of my years to come. Anyone who has known me for all or most of my life will likely be stunned by this revelation. If you know my family, I ask that you refrain from mentioning it to my parents. If you know me well, I simply ask that you respect that I cannot reveal any more details than I've shared here, and trust that I am indeed not fabricating what happened to me, I would swear upon everything that is dearest to me that it did happen. My parents (who do not have online access) would be crushed to learn about this, and they would seek details that I refuse to reveal to them or anyone else. Beyond the first assault, there have been other scary situations and abuses that I've rarely mentioned to anyone (stalked by 2 strange men at the store where I worked in my late teens, which required security guard detail when going to my car late at night; a time when I woke up unclothed in my apartment, with the bedroom and outside doors wide open and no recollection of what had happened since I entered the apartment and locked my door the night before, and yes, I was completely sober that night; random gropings on the subway when I lived in New York City and also at night clubs; forced kisses and bodily contact; typical cat-calls; etc.). After seeing all of the people who wanted to toss aside the women that came forward with sexual abuse stories about Trump, the idea hounded me, and I could not escape the call to complete it.

"Sexual assault is any type of forced or coerced sexual contact or behavior that happens without consent. Sexual assault includes rape and attempted rape, child molestation, and sexual harassment or threats. In the United States, nearly one in five women has been raped and almost half of women have experienced another type of sexual assault. If you have been sexually assaulted, it is not your fault.

I began this sculpture by covering a lightbulb with foil to create the body armature. Next, I drilled into a small round metal tin, then I mounted heavy gauge wire through the tin in a U shape and secured it with epoxy clay, to make the armature for the legs. I then filled the metal tin with sand to weigh down the sculpture. I wound the foil body armature with string to keep it all snug and in place, and I mounted the body armature to the leg wires. Next came a base layer of polymer over the legs and body, which was then cured, to give me a solid base layer. Then the face sculpting began. This face went through about 7 iterations before it resulted in what you see here. Certainly not perfect, but for the first time sculpting a face with intention to model it after a live person, I'm fairly happy with the results. There are some angles from where I think it really does look like Trump quite well. This exercise gave me a whole new respect for artists like Mike Viner who is able to capture the character of his models in the full 360˚ round.

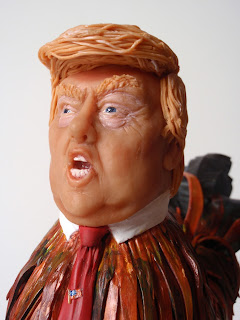


Once I had the face sculpted to satisfaction, I began on the body details. I started with the tail feathers, and built up layers of feathers on the body. There is a specific rooster breed that I used to model the body, that breed is Ameraucana (this similarity of name -to Americana- gave me a laugh). I added a shirt collar and tie, complete with American flag pin. Because Mr. Trump is so prone to fabrication and lying his pants off (http://www.politifact.com/truth-o-meter/lists/people/comparing-hillary-clinton-donald-trump-truth-o-met/), for the base I decided that I wanted him to look like he was standing in excrement, so I used a light beige color on the top part of the tin and a brown color on the bottom of the tin. I then sprayed mist paints in shades of brown, black and white to give the effect you see. After I had the base painted to satisfaction, I sculpted the feet.

One final cure later, he was finally finished late in the evening on October 31st... appropriate I think. Imagine a rooster deciding to parade around as the Donald on Halloween (or vice-versa), because it's a character he fancies yes, I can see that. It's taken me a couple days to photograph and gather the courage to write the things I've said in this blog post. And still more time and courage to push the "publish" button on this page.

If you have thoughts about the construction of sculpture, or if you'd like to publicly discuss your story of abuse, please leave me a comment below. Here's a warning for trolls: comments from political zealots for the GOP buffoon candidate will not be tolerated. And yes, I do have complete control of which comments get published on my blog, so don't waste your time writing something hateful because you don't agree with my politics. And please don't try to defend this arrogant cock's words or actions, he's proved to me through his demeanor and his own words that he is capable of doing the things he bragged about and the things of which he's been accused. Case closed.

To view the wonderfully creepy/weird creations that my fellow guild mates made last month, please check them out here: https://www.facebook.com/PolymerClayArtists/photos/a.1377143832296216.1073741858.211243825552895/1397378620272737/?type=3&theater
We're already starting a new challenge showcase for November, the theme is Christmas Ornaments! So check into the PCAGOE facebook page throughout the month of November to see what everyone creates! Should be a fun month!

Originally when I had pondered this challenge I had envisioned creating a funky/cool vessel with spikes and open spaces. I did not want to do a Trump sculpture, and honestly, I fought myself over this idea. I mean, who the heck want's a sculpture of Trump?!? (aside from the narcissist himself) Certainly NOT me! But once the idea came, it simply would not stop molesting my brain (pun intended). It didn't help my attitude seeing the people who defended his comments as locker-room banter, all over the internet. Then, one of my friends on facebook, actually another polymer artist, posed a question to her friends asking how many of her women friends had been sexually assaulted. It was stunning to see over just a 24 hour period that 160+ women were publicly acknowledging that they had been assaulted. And I found myself, for the first time ever, publicly acknowledging what happened to me with a simple yes. That was as brave as I could be.

Then there came the women who accused Trump of sexual assault, which were followed by denials from him, the campaign and from his followers. This included op-eds and memes which suggested that because these women had waited so long, their story must therefore be fabricated. This infuriated me and has made me just a little braver. You see, the first time I was sexually assaulted, it happened 40 years ago when I was a child. Other than the one who assaulted me (if that person remembers what they did), there is only one person who knows the details, my husband, the only person I could completely trust with something so grave, and it took me 25 years before I was able to share the story with that one solitary person. The details of my story will likely remain buried, because my husband will not break my trust and for me, the pain of bringing the truth to full light would far exceed the pain of concealing it all these years and for the rest of my years to come. Anyone who has known me for all or most of my life will likely be stunned by this revelation. If you know my family, I ask that you refrain from mentioning it to my parents. If you know me well, I simply ask that you respect that I cannot reveal any more details than I've shared here, and trust that I am indeed not fabricating what happened to me, I would swear upon everything that is dearest to me that it did happen. My parents (who do not have online access) would be crushed to learn about this, and they would seek details that I refuse to reveal to them or anyone else. Beyond the first assault, there have been other scary situations and abuses that I've rarely mentioned to anyone (stalked by 2 strange men at the store where I worked in my late teens, which required security guard detail when going to my car late at night; a time when I woke up unclothed in my apartment, with the bedroom and outside doors wide open and no recollection of what had happened since I entered the apartment and locked my door the night before, and yes, I was completely sober that night; random gropings on the subway when I lived in New York City and also at night clubs; forced kisses and bodily contact; typical cat-calls; etc.). After seeing all of the people who wanted to toss aside the women that came forward with sexual abuse stories about Trump, the idea hounded me, and I could not escape the call to complete it.

"Sexual assault is any type of forced or coerced sexual contact or behavior that happens without consent. Sexual assault includes rape and attempted rape, child molestation, and sexual harassment or threats. In the United States, nearly one in five women has been raped and almost half of women have experienced another type of sexual assault. If you have been sexually assaulted, it is not your fault.
Sexual assault can include:
- Any type of sexual contact with someone who cannot consent, such as someone who is underage, has an intellectual disability, or is passed out
- Rape
- Attempted rape
- Sexual coercion
- Sexual contact with a child
- Incest (sexual contact between family members)
- Fondling or unwanted touching above or under clothes
Sexual assault can also be verbal or visual. It is anything that forces a person to join in unwanted sexual contact or attention. Examples can include:
- Voyeurism, or peeping (when someone watches private sexual acts without consent)
- Exhibitionism (when someone exposes himself or herself in public)
- Sexual harassment or threats
- Forcing someone to pose for sexual pictures" -- https://www.womenshealth.gov/publications/our-publications/fact-sheet/sexual-assault.html

I began this sculpture by covering a lightbulb with foil to create the body armature. Next, I drilled into a small round metal tin, then I mounted heavy gauge wire through the tin in a U shape and secured it with epoxy clay, to make the armature for the legs. I then filled the metal tin with sand to weigh down the sculpture. I wound the foil body armature with string to keep it all snug and in place, and I mounted the body armature to the leg wires. Next came a base layer of polymer over the legs and body, which was then cured, to give me a solid base layer. Then the face sculpting began. This face went through about 7 iterations before it resulted in what you see here. Certainly not perfect, but for the first time sculpting a face with intention to model it after a live person, I'm fairly happy with the results. There are some angles from where I think it really does look like Trump quite well. This exercise gave me a whole new respect for artists like Mike Viner who is able to capture the character of his models in the full 360˚ round.


Once I had the face sculpted to satisfaction, I began on the body details. I started with the tail feathers, and built up layers of feathers on the body. There is a specific rooster breed that I used to model the body, that breed is Ameraucana (this similarity of name -to Americana- gave me a laugh). I added a shirt collar and tie, complete with American flag pin. Because Mr. Trump is so prone to fabrication and lying his pants off (http://www.politifact.com/truth-o-meter/lists/people/comparing-hillary-clinton-donald-trump-truth-o-met/), for the base I decided that I wanted him to look like he was standing in excrement, so I used a light beige color on the top part of the tin and a brown color on the bottom of the tin. I then sprayed mist paints in shades of brown, black and white to give the effect you see. After I had the base painted to satisfaction, I sculpted the feet.

One final cure later, he was finally finished late in the evening on October 31st... appropriate I think. Imagine a rooster deciding to parade around as the Donald on Halloween (or vice-versa), because it's a character he fancies yes, I can see that. It's taken me a couple days to photograph and gather the courage to write the things I've said in this blog post. And still more time and courage to push the "publish" button on this page.

If you have thoughts about the construction of sculpture, or if you'd like to publicly discuss your story of abuse, please leave me a comment below. Here's a warning for trolls: comments from political zealots for the GOP buffoon candidate will not be tolerated. And yes, I do have complete control of which comments get published on my blog, so don't waste your time writing something hateful because you don't agree with my politics. And please don't try to defend this arrogant cock's words or actions, he's proved to me through his demeanor and his own words that he is capable of doing the things he bragged about and the things of which he's been accused. Case closed.

To view the wonderfully creepy/weird creations that my fellow guild mates made last month, please check them out here: https://www.facebook.com/PolymerClayArtists/photos/a.1377143832296216.1073741858.211243825552895/1397378620272737/?type=3&theater
We're already starting a new challenge showcase for November, the theme is Christmas Ornaments! So check into the PCAGOE facebook page throughout the month of November to see what everyone creates! Should be a fun month!


