
It's been a while since I've written anything here on the blog. Part of that is because I haven't really devoted much time to working in the studio since last October. I chalk much of that up to a general malaise over what's happening to this country, which has deeply affected my motivation. Another part of the picture was simply the hustle and bustle of the holidays, paired with parental hospitalizations, plus household ailments from cold and flu season. And lastly, late in 2017, I decided to turn inward and focus on self-improvement. At the end of October, I began a routine (near daily) practice of yoga, which has both helped my physical and mental wellbeing. And early in 2018, I decided to tame the nutrition beast and begin the journey of losing the weight that has crept on over the years since I turned 35, that magical number when easy weight loss suddenly became unobtainable despite a regular fitness routine. I'm happy to report, after 2 months of dedicated whole-food nutrition, I'm down 12 pounds so far, and feeling SO much healthier! This year is shaping up to be the year of "me", focusing on re-making myself into the healthiest version of me.
But, despite all of the aforementioned obstacles to feeding my muse, I haven't been totally out of my studio... Back in the fall I committed to participating in an online design course (that was scheduled to begin in December), which was offered by Christine Dumont and Donna Greenberg, through Voila! This course was specifically focused on jewelry design and the design principle of balance using symmetry and asymmetry. The course was held online, and was attended by a fantastic group of polymer artists. Though we each worked on interpreting the course material in our own ways, the sharing of assignments in our online group not only spurred conversation and camaraderie, but also generated a bounty of inspiration. If you've read my blog before, you already know about my artist crush on the work of Donna Greenberg from previous posts mentioning her. Christine Dumont's meticulous graphic style is mind-blowing to me, and she is another polymer artist who I have admired. I had the good fortune to meet both of these ladies in person last August at Synergy4. When the opportunity to take this online class presented itself, I knew immediately that this was an experience I shouldn't miss.
Now, the class was supposed to wrap up within a certain time period, but because of holiday, health and personal issues, some of us did not complete our final projects until sometime later. Our instructors have graciously kept the group open and kindly continue to provide a final assessment of our finished projects. This past week, I was happy to finally complete the piece that I designed as a result of this course experience.

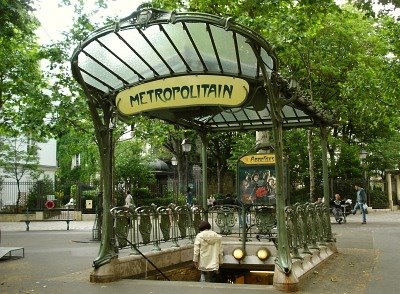
My jumping-off point for this piece was a necklace that I designed last year, with some of the cut polymer quilling strips. But I wanted to push the curvy swirls from that necklace into something more defined and sculpted. I've always been drawn to art nouveau styling and I wanted this new piece to reflect that design influence. My brain started to focus on the remembrance of the art nouveau styled metro stations in Paris. Perhaps this was because one of my best friends from my high school/college era, with whom I spent some time in Paris, was concurrently taking classes to reinvigorate his French. He and I enjoy reminiscing those years of our youth, and these metro stations in Paris have captivated me from the first time I saw them:


But, despite all of the aforementioned obstacles to feeding my muse, I haven't been totally out of my studio... Back in the fall I committed to participating in an online design course (that was scheduled to begin in December), which was offered by Christine Dumont and Donna Greenberg, through Voila! This course was specifically focused on jewelry design and the design principle of balance using symmetry and asymmetry. The course was held online, and was attended by a fantastic group of polymer artists. Though we each worked on interpreting the course material in our own ways, the sharing of assignments in our online group not only spurred conversation and camaraderie, but also generated a bounty of inspiration. If you've read my blog before, you already know about my artist crush on the work of Donna Greenberg from previous posts mentioning her. Christine Dumont's meticulous graphic style is mind-blowing to me, and she is another polymer artist who I have admired. I had the good fortune to meet both of these ladies in person last August at Synergy4. When the opportunity to take this online class presented itself, I knew immediately that this was an experience I shouldn't miss.
Now, the class was supposed to wrap up within a certain time period, but because of holiday, health and personal issues, some of us did not complete our final projects until sometime later. Our instructors have graciously kept the group open and kindly continue to provide a final assessment of our finished projects. This past week, I was happy to finally complete the piece that I designed as a result of this course experience.

My jumping-off point for this piece was a necklace that I designed last year, with some of the cut polymer quilling strips. But I wanted to push the curvy swirls from that necklace into something more defined and sculpted. I've always been drawn to art nouveau styling and I wanted this new piece to reflect that design influence. My brain started to focus on the remembrance of the art nouveau styled metro stations in Paris. Perhaps this was because one of my best friends from my high school/college era, with whom I spent some time in Paris, was concurrently taking classes to reinvigorate his French. He and I enjoy reminiscing those years of our youth, and these metro stations in Paris have captivated me from the first time I saw them:

Here's the necklace that was my jumping-off point:

As you can see, my design changed quite drastically from the jumping-off point. You can see the stronger influence (including the color scheme) from the art nouveau metro station images.
For those interested, below I will detail my full process for creating this piece. There will be more photos of the finished piece and a video which demonstrates the physical flexibility and position-ability of this piece. To start, I sketched out a few ideas. After pairing down features that didn't work, I chose the sketch in the next image to be the starting point. Also in the next image is the wire armature that I created, this wire armature is what allows the necklace to be customized by positioning it to contour the wearer's body. The wire armature is a 16 gauge aluminum wire. At the points where 2 wires meet, they are wound with a thin 28 gauge wire for joining.

The next step in the design process was a base layer of polymer. Keeping in mind that I wanted this piece to flex without breaking, I decided to go with a 50/50 blend of Cernit translucent and Bake 'n Bend white. Below is an image of the base layer before curing:

During curing of this base layer, some areas cracked. I'm not sure why this happened, perhaps from the heat of the wire, perhaps from the temperature of the oven... I filled in the cracks and re-cured until the entire piece was solid and ready for the decorative layers.
I started by covering the piece in another blend of Cernit (this time in the Shiny green color) mixed with Bake 'n Bend in the green color. This blend was approximately a 75 percent (Cernit) to 25 percent (BnB). I decided that the best way to cover this piece was to start with the back. I wanted a line inscribed texture for the back and scratched that into the surface before curing. Here's a shot of the backside of the necklace:

After the backside was sculpted, it went in for another cure. Once cured, I began the decorative layer on the front. I worked one half of the necklace at a time, as seen in the next photo, and cured the necklace after the first half was sculpted before starting the decorative layer on the second half.

Once both sides were covered and sculpted to my liking and put in for the final curing, I added some antiquing using a matte polymer varnish with Paynes grey acrylic paint to the green areas. The gold rounds were treated to a dusting with gold mica while raw, but after curing they were then painted with a coating of a gloss polymer varnish, some metallic bronze paint was added to some of this varnish for painting around the bottoms of the rounds to give depth and simulate pearls.


I am quite pleased with the finished piece. I've already worn it when we went to a concert on Saturday, and happily report that it is very comfortable to wear, which is an important factor. While this piece will likely remain in my permanent collection, I think there is a strong possibility that I will create other iterations of it in the future.
This was my first time using Cernit. I chose this brand based on what I saw at Synergy4 in the pieces of Marie Segal (another polymer artist and kind soul who I admire). I was impressed with the strength and flexibility of the Cernit pieces that Marie brought to Synergy, many thanks go to Marie for discussing the benefits of Cernit with me. And thanks go to the generous Maria Alexandrou for demo-ing her flexible cuff tutorial at Synergy4, it was from that demo that I learned the possibilities of mixing bake n' bend with regular polymers to add flexibility. Speaking of which, here's that video showing the flexibility and position-ability of this piece:
My experience with the Voila course was superb, and I plan to participate in the next class offering by Christine and Donna, which is listed on the website as TBA in 2018. I am already looking forward to how that class will stretch my design skills and knowledge even further. Another huge Thank You goes out to Christine, Donna, and all the other polymer artists who participated in this course. If you are a polymer artist, and you are wanting to push your design skills to another level, I highly recommend taking one of the upcoming Voila courses. Please do take some time to view Donna's and Christine's amazing work at their respective websites.
If you're still with me (I know this was a long blog post), and if you have any comments or questions for me, I'd love to hear what you think about my latest creation.... Please do leave me a comment below! I do plan to get back to creating on a more regular basis; at the least, I hope it won't be another 5 months before I have something new to share. Until then, Thanks for stopping by my blog!


