Showing posts with label bottle. Show all posts

Sunday, January 3, 2016

Season of Giving and Making

I hope that everyone reading this blog has had a wonderful holiday season! And my best wishes to everyone for happiness, health and prosperity in 2016!

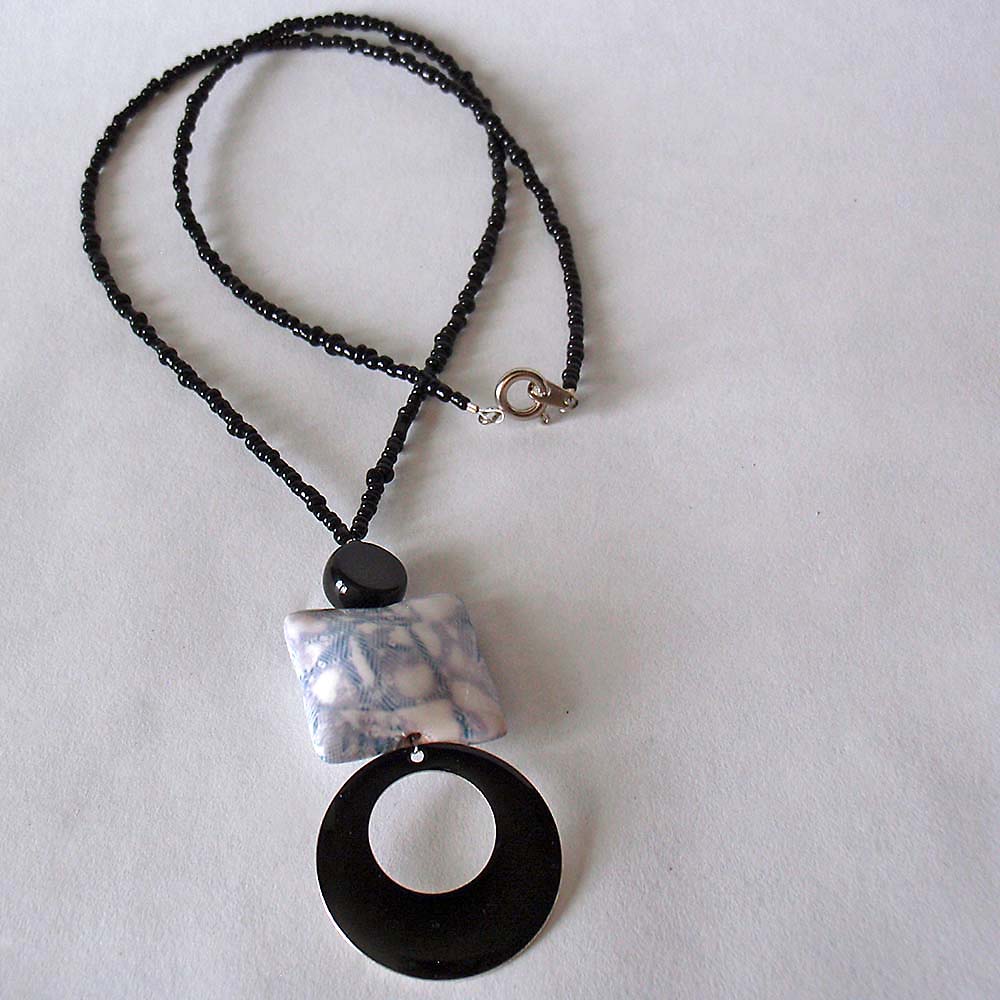
Because it was such a busy month preparing for the Christmas holiday in my home, and making gifts, I didn't get time to create a new piece for the PCAGOE January challenge. Luckily, I had an older piece that suited the theme, which is 50 Shades of Gray... no, not associated with the infamous book, but a study in value! I chose an older necklace that I had created with my silk fabric dye transfer. Here are a few shots of that piece:


 So, what was I so busy doing that I couldn't create a new piece for the challenge? Making gifts for family and friends. First on the list was a stocking that my hubby had asked me to make for him... which, at the moment, I do not have a photo. Basically it's a red stocking edged with candy striped trim, super simple.

The second project was a pair of slippers that I made for my mother-in-law. She loves these slippers that I make, and she will wear them until they have holes in the soles all the way through to her toes!  So I decided it was time she get another brand new pair. This pair is triple reinforced on the soles and upper is made of neoprene, so hopefully they will last a lot longer than her previous pairs have! Here's what they look like:

 About a week before Christmas I decided that I would make and send out origami stars, which I made out of our Land's End holiday catalogs, to my family and some friends. I generally skip sending Christmas cards because of the thousands of trees that are destroyed to make all of the paper for them. But my traditionalist hubby grumbles every year that I send out a Christmas email in lieu of Christmas cards. So this year I decided to compromise with the origami stars, getting the last minute idea to upcycle my holiday catalogs, which was an added bonus! I made about 70 (give or take a few) stars. And here's a sampling of what those looked like:


Last, but not least came the polymer gifts. I needed a little gift to give to my personal trainer, who gives me the gift of her creativity twice a week, to create challenging and always varied workouts that keep me wanting to return and wishing I could work out with her daily(which is a miracle in and of itself!). And I wanted another special gift for my friend and soul sister, with whom I knew I'd be spending New Year's Eve. In addition, I wanted to create a special gift for my parents. A month beforehand, I had the foresight to start a homemade lavender essential oil, by steeping a jar full of lavender buds in carrier oils for a month long, this was the idea behind the 2 gifts that followed, for my trainer and my friend. I created for Angel, my trainer, this polymer covered bottle which I then filled with my homemade lavender oil:


I created an inro necklace for my dear friend, Susan. Inros are small vessels, this one was created from a perfume sampler bottle, complete with the wand attached to the lid. After the polymer for this piece was cured, I then filled it with my homemade lavender oil:


And finally, I upcycled a chandelier light bulb into a cardinal tree ornament for my parents. My mom has always loved birds, but especially birds on her Christmas tree. As a matter of fact, her parent's always had the old-fashioned glass birds on their tree. As such, my mom has gifted her children and her siblings a glass bird ornament every year at Christmas. The glass bird she gifted me this year was this sweet owl:

Here are two of my other favorite bird ornaments that my parents have given me over the years:


These bird ornaments, with their fibrous and feathery tails, were the inspiration for the cardinal ornament that I created for my parents. He is quite large though, I'd estimate that he measures about 7" from beak to tail, and about 5" tall. I created him with the red glitter Premo accent polymer, with some black and a little bit of an orange mixture. The legs were made by covering an armature of wire with polymer and baking separately before inserting them into the body of the cardinal. And the plume of tail feathers and comb feathers was created by integrating some sheer red fabric strips into the polymer at those points. My parents both loved him. My only wish is that he were lighter in weight. The bulb was a pretty heavy glass to begin with, but then there was about 2 to 3 ounces of polymer added to him. Here he is:


I also created some polymer gifts for 3 of my PCAGOE guild mates, using my handmade texture plate from a previous PCAGOE challenge, for the the gift exchange the guild offers every year. I forgot to take my own photos of the pieces, but these are the photos my guild mates took of the pieces I made for them:


Here are the lovely gifts I received in exchange, from my talented guild mates (in order, from Linda Riopel of NKDesigns, Susan O'Neill of 11BOLDstret, and Jackie Sieben of JAE Jewelry and The Pleasant Pheasant)


So, with making all these gifts, getting my house decorated for Christmas and baking a couple batches of cookies, I did not have any time left to make my challenge piece, thus the older piece that I've entered for this month (above). For anyone who might be interested, that necklace is available in my createmyworld etsy shop here. 
Whew! That was quite a lot to post about! What do you think of all the gifting creations I made? Do you like handmade gifts to give and receive? What was your favorite handmade gift? I'd love to hear from you, leave me a comment below!

Voting is open for the January challenge, and you can cast a vote for your 3 favorite entries at the PCAGOE blog. Remember, you could win a prize! Voting closes on the 7th of January at midnight EST.


Friday, May 23, 2014

Art Deco Dreams

My favorite two design styles are the Art Nouveau and Art Deco periods. (If you're here in search of my Bead Soup reveal, please scroll down to the next post or find it here)  My latest polymer project proved difficult, simply because I love both of these styles and I had many ideas and inspiration.My guild's challenge theme for June 2014 is Art Deco/Art Nouveau, hence my dilemma.  I'm actually more drawn to the Art Nouveau style, and I had originally had something else entirely in mind when I stumbled upon this fantastic bottle at my local Goodwill:


This bottle screamed Art Deco to me.  Actually, as it sat on the shelf at the Goodwill it called out to me, "you must use me for the Art Deco challenge"... really it did! ;)  I tried to ignore it, because well, I already had something else in mind for this project, but it sat there staring at me saying, "You can't ignore me, you know you must use me".  And so I brought it home.  This baby is big, with the globe stopper on top, it measures 16" tall, with the stopper pulled off, the bottle alone is 12.5" tall and about 6" in width at the widest point.  The cd in the photo above is for scale, to give you an idea of just how large this piece is. 

So I began by sketching out an idea.  I decided to stick with a traditional Art Deco palette in peachy/coppery tones. I started out with the first layer, covering the tear drop shapes with a blend of translucent premo mixed with a tiny bit of pearl white and a lot of copper metal leaf. For the other areas of the bottle's first layer, I chose premo copper straight from the package.  I cut some circular shapes and a line connecting them down the centers out of the teardrop areas and put it in for the first cure:


After a nice sanding to get rid of any bumpies, during which the cut circles popped off of the piece, I worked on building the next layer.  Using the half circle shape on my extruder, the extruded lengths were used to frame the teardrop shapes in a blend of premo copper, sienna and red.  A cut pattern of radiating rays and circles (in premo bronze mixed with translucent) was put in place to decorate the copper areas.  And a large circle was placed around the top... in it went for a 2nd cure: 


 The next step was to add more circles around the top, cover the bottle's lip and to cover the bottom.  I also had to cover and decorate the globe shaped stopper.  The top 1/3 of the stopper had a beautiful pattern of graduating rings, which I wanted to keep uncovered.  I used the translucent/metal leaf blend, the copper premo and the bronze/translucent blend for the base layer of the stopper.  The cut decorations on the stopper were also done in the bronze/translucent blend.  


 After the 3rd cure, I coated the entire piece with liquid polymer and hit it with the heat gun.  A fourth and final bake to ensure that it was fully cured, and it's finished!  I didn't want a high gloss sheen on this one, so I didn't sand or buff any further, I quite like the semi-gloss finish that resulted from the liquid polymer glazing.  I was going to glue the circle shapes back into place in the teardrop areas, but I like it better as open glass, besides it mimics the open glass as on the top of the stopper. 


Once again, I'm fairly happy with this project.  But it's not one that I feel I need to keep, so it will likely be going into my etsy shop, unless the hubby protests! ;)   What do you think?  Let me know in the comments, and tell me what's your favorite time period for style and decoration?  Voting for this challenge will open on June 1st and will run through June 7th midnight EST.  I'll try to remember to post a reminder here with the link!

Saturday, July 6, 2013

The Gift of Hope

July means charity theme for my guild, the PCAGOE (Polymer Clay Artists Guild of Etsy).  This year we decided to do Bottles of Hope as our charity.  Bottles of hope are little bottles that are covered in polymer clay which are then given to cancer patients.  Each bottle represents a wish for hope and health.  The Bottles of Hope project has spread internationally, and you can learn more about this great cause at:  http://bottlesofhope.org/

Because most of our guild members personally know at least one person who is currently battling cancer, it was decided that each person would make at least one bottle to donate, and additional bottles for any friends or family affected by cancer.  I have a friend that has been courageously fighting cancer for the last 5 years, and continues her battle today; so I decided to make one bottle for her in addition to my donation bottle.  Also, due to member's limited time in the summer and our limited participants this month, the guild decided that we could enter up to 3 bottles per person, which is why both of my bottles are found in the guild challenge.  Here are photos of my 2 entries:


My concept for both of these bottles was based upon the desire to give a bottle that illustrates being filled with love and hope, not empty. But how to decorate the outside of the bottle to allow for the hope inside to show through? This problem was solved by covering part of the bottle with translucent liquid polymer with inclusions of embossing powder, to create a translucent but colored layer. Part of the bottle was left naked, to create a window to see the inside clearly. The polymer pieces on the top of the lids are both each attached securely to the lid with a screw. And the "hope" that is inside consists of many tiny polymer hearts and spirals. It was my original intention that the owner could make a wish on each heart and spiral, or share the tiny tokens with anyone she wants to give a little love or hope. The bottle is tiny, measuring in at 3" tall and about 1" wide at the widest point, the hearts and spirals inside the bottle are about 1/4" wide and 1/4" long. More views of these bottles can be found in my flickr photostream at: www.flickr.com/photos/createmyworlddesigns

Here is the group photo of the other entries from all the participating guild members:

Surely another tough decision to choose just 3 favorites.  As always, great effort went into each creation resulting in 11 wonderful pieces of art!  So please head over to the PCAGOE blog to cast your vote, you have until July 7th midnight EST!

Tuesday, April 16, 2013

Figures... a practice of the human form and my process of achieving my latest sculpt


I've drawn and painted human bodies and faces from life countless times throughout my artistic background, but had never before done a sculpt of the human form.  So, when I lit upon the idea of sculpting a female figure as Mother Nature for the last PCAGOE monthly challenge, I knew it would certainly be a challenge. But, given my background of studying the human figure for drawing or painting, I was fairly confident that it was a challenge I could meet. The challenge theme for April was "the Seasons" (Spring, Summer, Autumn and Winter). My idea was to create Mother nature and decorate her form with the progression of the seasons; with the idea of a spring seed sprouting from her one hand, the vine continuing up her arm and onto her torso; leafing out in the full foliage of summer on her torso; eventually leading to vine down her other arm, turning to fall colors with two falling leaves which dangle from that hand. The thought to add winter to the bottom of her form, brought about the idea of a base where her torso blends into a tree trunk, with bare branches reaching outward.

This female figure concept initially began about a year ago, when I purchased a couple bottles of Vanilla Extract that happened to be hourglass shaped.  I instantly thought "female form" when looking at these bottles.  I thought perhaps I might do a miniature polymer dress form mannequin someday.  When I struck upon the idea of Mother nature for this challenge, I immediately thought of using one of those bottles.  So, this sculpture is a working bottle.  The next photo shows the sculpture with an example of what is at her core:

The following is a description of my working process to create the Mother Nature bottle sculpture:  The empty glass bottle was first fitted with 2 pieces of wire that were twisted together at both ends, leaving an opening in the center, through which the neck of the bottle was placed.  This created the armature for her arms.  The wire rests on the areas of the bottle which define the form's collar bones and scapula area on the back (next time I make one of these I will photograph this step), so it actually helped to define the collar bones of the form.  The wire was glued into place on to the bottle with super glue.  The tree trunk base has a core that is a cardboard spool which once held a skein of thread.  The head is supported with a screw that was driven through the metal cap of the bottle.  Her head fully unscrews from her body, as you can see in the first photo at the beginning of this post.

In the next handful of photos you can view a sampling of the progression of the sculpt.  In the first photo, you can see the rough sculpt of the body and arms, shown with one of the bottles, and my human anatomy for artist's book (which was my guide in getting the form right, since I didn't have access to a live model).  Take note too, of the screw protruding from the cap on the sculpted body, this is the armature for the head, ensuring that the bottle can be opened without having her head pop off the cap! 

The next photo is basically the next stage of the sculpt, adding more weight to her arms and the 1st sculpt of her head. 

At this next stage, a little more weight was added to her arms and her face is starting to take shape (more layers were eventually added to the face for better feature proportions).... you can see how rough her skin looks at this point (I don't have those nice silicone sculpting tools; I was working with my knife, my fingers, a pointed needle tool and a small round metal burnisher).  This was the stage when my husband saw her for the first time; his first comment was, "why did you make her so old and ugly?"... after he was banished from my studio ;)  I set out on the next step, baking her a second time.
 

After the second baking, she went through a sanding process to smooth out the bumps and ugliness so honestly pointed out my my dear hubby, and this was the result:


After this stage, she was coated with translucent liquid polymer and baked (two times) to give the skin a nice finish.  Finally, her torso was attached to the tree trunk base (which was sculpted with wire added to create the bare branches of the tree and baked separately).  Clay was sculpted over the join of the torso and tree trunk base to hide the seam and she was baked again.  The seed, vines and leaves were added, facial features were enhanced (eye lashes, eyebrows, color to her lips and highlights to the whites of her eyes) and she was baked to cure the final details.  I lost count, but I think she was baked a total of 8 or 9 times from beginning to end.  Her hair is made from angora fleece and was attached section by section to her head with super glue, which was a messy job; there has to be a better way to do this part, which I will be researching before my next human form. (Yes, a "next one" is already in planning stages and will be a "sister" to Mother Nature).  As a final touch some translucent gloss acrylic was added to her eyes and lips for shine. By this time, it was 11PM on the night of the midnight deadline for my guild's challenge, so I took a photo of her at night, at a bad angle and without adequate lighting... which resulted in a sinister look on her face (that photo is in my flickr if anyone didn't see it in the challenge entries).  Before I took daylight photos, I noticed that the vines on the front of her torso were off balance and threw the entire design off... so the next morning I set to work to fix that imbalance, happily forgetting to get daylight photos to include in my flickr and to add links to my challenge description.  That is why I held off in posting the daylight photos of her here and on my flickr until after the challenge voting ended. 
While I am fairly happy with how she turned out, her torso sculpt is the area with which I was most pleased, especially her back.. I was also especially pleased with the vine design on her back.  The front of the torso could use improvements, the same is true of her hands.  The area which I think begs for the most improvement is the face sculpt, it just did not turn out as well as I had hoped.. more study to do in that area for female body #2 which is coming soon...  Mother Nature is available in my etsy shop.