Showing posts with label holiday. Show all posts

Sunday, January 3, 2016

Season of Giving and Making

I hope that everyone reading this blog has had a wonderful holiday season! And my best wishes to everyone for happiness, health and prosperity in 2016!

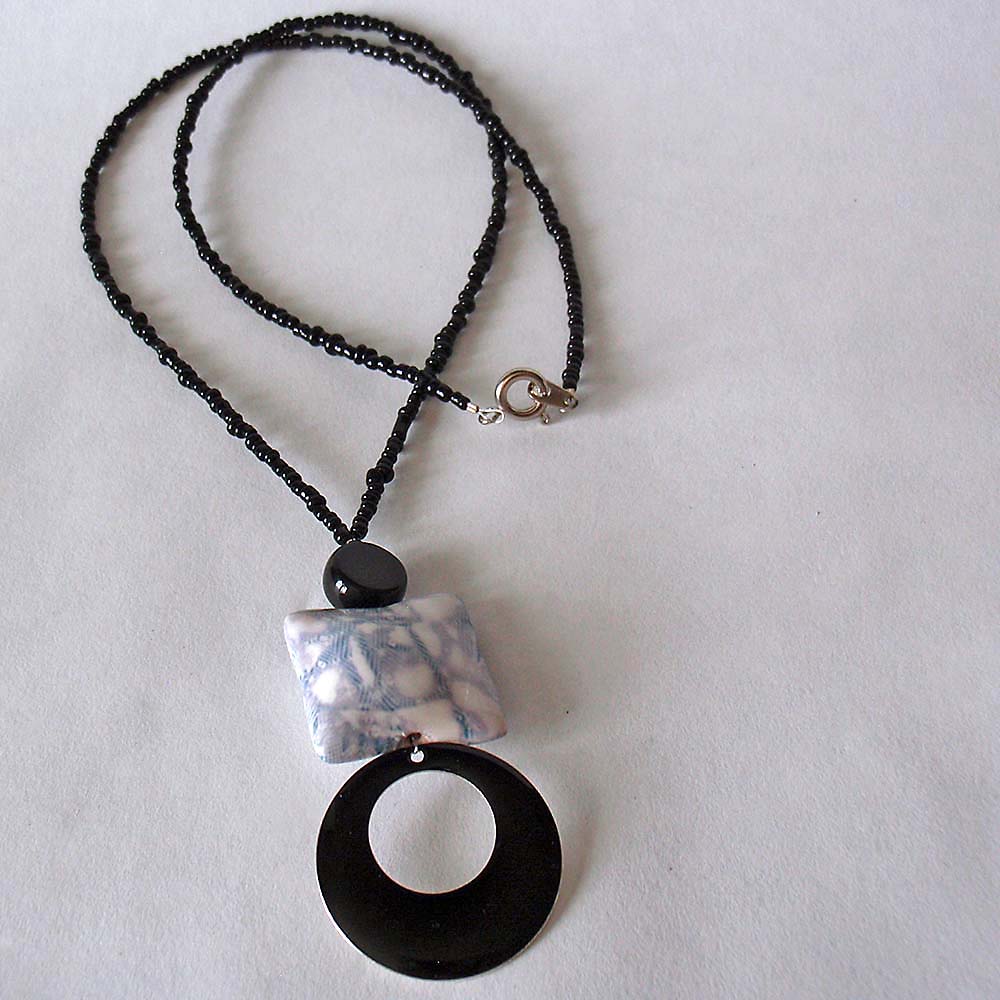
Because it was such a busy month preparing for the Christmas holiday in my home, and making gifts, I didn't get time to create a new piece for the PCAGOE January challenge. Luckily, I had an older piece that suited the theme, which is 50 Shades of Gray... no, not associated with the infamous book, but a study in value! I chose an older necklace that I had created with my silk fabric dye transfer. Here are a few shots of that piece:


 So, what was I so busy doing that I couldn't create a new piece for the challenge? Making gifts for family and friends. First on the list was a stocking that my hubby had asked me to make for him... which, at the moment, I do not have a photo. Basically it's a red stocking edged with candy striped trim, super simple.

The second project was a pair of slippers that I made for my mother-in-law. She loves these slippers that I make, and she will wear them until they have holes in the soles all the way through to her toes!  So I decided it was time she get another brand new pair. This pair is triple reinforced on the soles and upper is made of neoprene, so hopefully they will last a lot longer than her previous pairs have! Here's what they look like:

 About a week before Christmas I decided that I would make and send out origami stars, which I made out of our Land's End holiday catalogs, to my family and some friends. I generally skip sending Christmas cards because of the thousands of trees that are destroyed to make all of the paper for them. But my traditionalist hubby grumbles every year that I send out a Christmas email in lieu of Christmas cards. So this year I decided to compromise with the origami stars, getting the last minute idea to upcycle my holiday catalogs, which was an added bonus! I made about 70 (give or take a few) stars. And here's a sampling of what those looked like:


Last, but not least came the polymer gifts. I needed a little gift to give to my personal trainer, who gives me the gift of her creativity twice a week, to create challenging and always varied workouts that keep me wanting to return and wishing I could work out with her daily(which is a miracle in and of itself!). And I wanted another special gift for my friend and soul sister, with whom I knew I'd be spending New Year's Eve. In addition, I wanted to create a special gift for my parents. A month beforehand, I had the foresight to start a homemade lavender essential oil, by steeping a jar full of lavender buds in carrier oils for a month long, this was the idea behind the 2 gifts that followed, for my trainer and my friend. I created for Angel, my trainer, this polymer covered bottle which I then filled with my homemade lavender oil:


I created an inro necklace for my dear friend, Susan. Inros are small vessels, this one was created from a perfume sampler bottle, complete with the wand attached to the lid. After the polymer for this piece was cured, I then filled it with my homemade lavender oil:


And finally, I upcycled a chandelier light bulb into a cardinal tree ornament for my parents. My mom has always loved birds, but especially birds on her Christmas tree. As a matter of fact, her parent's always had the old-fashioned glass birds on their tree. As such, my mom has gifted her children and her siblings a glass bird ornament every year at Christmas. The glass bird she gifted me this year was this sweet owl:

Here are two of my other favorite bird ornaments that my parents have given me over the years:


These bird ornaments, with their fibrous and feathery tails, were the inspiration for the cardinal ornament that I created for my parents. He is quite large though, I'd estimate that he measures about 7" from beak to tail, and about 5" tall. I created him with the red glitter Premo accent polymer, with some black and a little bit of an orange mixture. The legs were made by covering an armature of wire with polymer and baking separately before inserting them into the body of the cardinal. And the plume of tail feathers and comb feathers was created by integrating some sheer red fabric strips into the polymer at those points. My parents both loved him. My only wish is that he were lighter in weight. The bulb was a pretty heavy glass to begin with, but then there was about 2 to 3 ounces of polymer added to him. Here he is:


I also created some polymer gifts for 3 of my PCAGOE guild mates, using my handmade texture plate from a previous PCAGOE challenge, for the the gift exchange the guild offers every year. I forgot to take my own photos of the pieces, but these are the photos my guild mates took of the pieces I made for them:


Here are the lovely gifts I received in exchange, from my talented guild mates (in order, from Linda Riopel of NKDesigns, Susan O'Neill of 11BOLDstret, and Jackie Sieben of JAE Jewelry and The Pleasant Pheasant)


So, with making all these gifts, getting my house decorated for Christmas and baking a couple batches of cookies, I did not have any time left to make my challenge piece, thus the older piece that I've entered for this month (above). For anyone who might be interested, that necklace is available in my createmyworld etsy shop here
Whew! That was quite a lot to post about! What do you think of all the gifting creations I made? Do you like handmade gifts to give and receive? What was your favorite handmade gift? I'd love to hear from you, leave me a comment below!

Voting is open for the January challenge, and you can cast a vote for your 3 favorite entries at the PCAGOE blog. Remember, you could win a prize! Voting closes on the 7th of January at midnight EST.


Sunday, December 21, 2014

Happy, Shiny Christmas Tree!

I'm an "in the moment, season-to-season" kind of girl. It's rare for me to rush any season by wishing for the next one. This has good points and bad. The good is that I am enjoying the moment. The bad is that when all the business-minded artists and crafters are creating items to sell a season ahead of time, I'm living in the moment and my creations celebrate the season at hand... when fall arrives I'm inspired to make fall items, when the winter holidays are upon us, I'm compelled to create Christmas items. So, while this challenge piece is for the January 2015 challenge, I'm still in Christmas creating mode. This month for my guild, the PCAGOE, our theme is "Illuminated" (any item that is lit by a light or candle).


As happens fairly often, the piece I chose to create was based upon an item I found at my local thrift store. I found this hinged, wire, pyramidal shape that I imagine was supposed to be a sort of abstract Christmas tree. I decided this would be a great little piece to turn into a polymer Christmas tree light. I wish I had taken a before photo of the frame, but it is still exposed on the inside, so you can get an idea from this:


I began by creating flat slabs of translucent Premo in the shape of each side of the pyramid top and base. After these were cured, I glued them onto the frame and sealed the seams with bonding agent and more translucent polymer to smooth out the corners. The entire piece went in for the second curing. Unfortunately, I wasn't thinking about the polymer + heat + gravity factor and did not give it any extra support on the outsides. For those who are not familiar with curing polymer: while fully cured and cooled polymer is extremely durable, if one does not give support to 3 dimensional objects during the heat process, the heat and gravity can make the polymer break or crack when it's in the oven. If a piece is properly supported, this does not happen... proper support seems to be a lesson I am destined to re-learn often! While the frame was there for support on the inside, it was only attached to the outer edges of the frame. With the piece sitting on one of it's sides in the oven, 2 of the side pieces were pulled downward by gravity, resulting in cracked pieces. Because nearly each piece I make is a new and unique idea, there's almost always a learning curve filled with accidents. In this case, I patched it back up with bonding agent and more translucent polymer, cured it and decided to move onward. One of the things I love about this medium is that you can almost always fix problems that may arise. But, because of the patched cracks, I now needed a surface treatment that would hide the patch (originally I had intended to stain the polymer with inks, sort-of like a watercolor painting)....


A while ago, I had the idea to use Ginger Allman's (of The Blue Bottle Tree) Holo effect to create the illusion of facets on a diamond shape (right after I created my Diamond in the Rough container). At that time, I purchased the tutorial from Ginger and put the idea aside for a while. I still have yet to recreate that diamond project using the hollo effect technique, if you follow this blog, you know how rare it is for me to revisit an old project. So, as I was considering what surface treatment to use for this piece, my eyes glanced upon the materials I had purchased for Ginger's Holo effect and that serendipitous moment decided the outcome of this piece. I set to work and finished the outside of the top with a green holo effect and the base with a golden holo effect. I didn't give any texture, as Ginger does to her pieces; I kept it flat because I wanted to see how this technique might be used to create that previous faceted diamond idea, for which I would also want no texture.  Here's a close-up of the tree, so you can better see the holo effect's iridescent shine:


After the holo surface was cured, I covered the corners and edges with strips of raw polymer and bonding agent. After this was cured, next came the dilemma of how to decorate the tree. I decided upon extruded strands that curl and meander around the tree, with multicolored light bulbs reminiscent of C7 bulbs. The base decoration became an extruded, curly and meandering strand of Premo red sparkle clay. I also made a little star to sit atop the tree. This star was also treated to the gold holo effect and it is outlined in gold and sparkle red polymer. It is removable, held to the top of the tree with 2 strong magnets. I did this specifically to avoid having the star bend or break during storage.


As always the process of bringing the concept of this piece to a final product was enjoyable, even with the frustration of the start. I'm especially happy with the holo effect, it reminds me of iridescent dichroic glass, so bright and shiny... such a happy little tree. Oh speaking of "little", the dimensions are 10.5" (from the tip of the star to the base) and 4.5" at the widest point of the base. I wish I had been able to take more time to do this project, to refine things, but I'm in the middle of another big project plus the preparation for the holidays, so this one got more rushed than I would have liked. But overall, I'm quite pleased. If you're intrigued by the holo effect, I highly recommend Ginger's tutorial, she explains everything in thorough detailed description and photos.


I'd love to hear what you think of my little, happy, shiny tree... leave me a comment below!
Whatever holiday you may celebrate this season, I extend warm wishes for a happy holiday.. and cheers to a healthy 2015! The voting for this challenge will begin on New Year's Day and will be open until midnight on the 7th. I'll post a reminder here when voting is open!

Sunday, December 22, 2013

Recycled Christmas

Any one who knows me, or has read this blog, likely knows how concerned I am with environmental issues.  As a result of my enviromentalism, I have learned to look at "trash" with a different lens.  I try to minimize our trash by refusing, reducing, recycling, upcycling, mending and repurposing.  My OneMoreUse line of products and etsy store was born out of my desire to reduce my household trash footprint (specifically single use plastics).  So whenever any product is past it's intended use in my household, I give creative thought as to how I might repurpose, recycle or upcycle each item. 

For January 2014, my guild's (PCAGOE) challenge theme is Recycled, which is a theme that speaks to both my sensible environmentalist self and also my artistic creative ideas.  I wanted to do something really unique for this challenge.  The solution for something different presented itself when my very organized hubby threatened to reorganize our silverware drawer.  He is the type of person who needs to be able to see and easily access whatever item he needs from a drawer, closet, cabinet, etc.  While I certainly like things neatly sorted too, because I have a pretty good memory of where items are located even when hidden, I am guilty of cramming as much as I can into any available space... so if that means I have to lift up a few spatulas to get to the ice cream scoop, I'm okay with that; this method drives the hubby crazy.  Every so often he threatens to organize something, which essentially means tossing some items, which he deems unworthy of the space they occupy, into a bag for a thrift store donation.   When he does threaten, I make sure to get the job done before he has a chance, that way I can be sure not to lose my favorite tools.


So, when I tackled the silverware drawer, I came across these hand mixer beaters that I had kept although both hand mixers that we've had in the last couple years have died and were irrepairable.  Removing these 4 beaters gave me enough room to organize my drawer to the hubby's standard; Perfect!  Normally I would send these to the local thrift, but I've seen a container full of such beaters sitting at said thrift store, so I don't think they have much of a market once the mechanicals of the mixer actually dies.  So I decided that THIS would be my item to use for my recycled project! 

I envisioned the beater becoming a stylized Christmas tree.  I made a red base for it, with green polka dots.  I secured the beater into the base and then coated the beater with many layers of Kato green colored liquid polymer that I added gold mica to create a custom color.  The scrolled filigree tree design is meant to mimic the look of quilled paper (as I explored in a previous piece here), and the design on each of the 4 paddles is the same.  I added some red dots to carry over the same design as on the base and add some contrast interest in the tree.  In the following photo of the tree with two paddles turned forward, you can more easily see the scroll pattern and you can see the areas of the metal batter more easily. 


While this was my first attempt at this idea, and it's far from perfect, I was very pleased with how it turned out, considering how difficult it actually was to complete.  I do have new ideas on how I will improve upon the execution of this type design in the future.  I just need to make time to revisit the idea before forging into something new, which is always a problem with me!  My favorite part of the creative process is the idea stage, and I always have way too many ideas waiting to be brought to life!  Here's a detail photo of the scroll work:

And finally a top-down view:

Voting for this challenge will open on January 1st and will run through January 7th.  I will try to remember to post a voting reminder here when the voting opens.  Last month, I was again honored to be chosen in the top 3 entries of both the public and the member vote for my penguin snowglobe piece.  Many thanks to everyone who took a moment to vote!  Comments are always welcome, so let me know what you think about this piece in the comments!  And a Very Merry Christmas to those who celebrate this holiday.  For everyone I wish you a happy holiday for whatever you celebrate... and a Happy, Healthy 2014 to all!!


Sunday, November 24, 2013

A Holiday Tribute to My Brothers

This month my polymer guild's challenge theme is "Beads and Baubles", which basically means anything Christmas or holiday related.  It's no small wonder that my thoughts of "Christmas or Holiday" lead to my family.  Some of my most cherished Christmas memories (as with most people) are centered around my childhood.  30 + years later, I can still recall the anticipation and excitement I had as a 5 year old waiting for the big day to arrive; Can still see myself twirling around on the hardwood floor, pretending to be Dorothy Hamil, whilst my mom's favorite Christmas albums played in the background.  Can still feel the thrill of the annual search at our favorite tree farm, to tag THE perfect tree well in advance of the holiday season.  I can clearly remember decoration sessions which ended with fighting over who got to put the peacock ornament on the tree... and many countless other Christmas related moments.


Because I am the youngest of 3, I have fond memories of sharing those times with my siblings.  I have 2 older brothers who certainly played a big role in most of my childhood remembrances.  While there are some recollections that are sweet and dear to my heart, there are others that make me think of the dynamic of our family which give me a chuckle.  Because I am the youngest, and only girl, my big brothers (who share my father's ever-mischievous character) delighted in tormenting me in many ways.  One of their chosen methods of teasing was to tell tall tales which, to their fairly gullible baby sister, were taken as truths.  Our poor mother had to soothe many a tear, and banish a few nightmares, over some of the stories that wreaked havoc with the imagination of the youngest of her brood.  It was the memory of one of those tales which was the final key to bring my challenge piece together this month.


You see, I had decided that for this challenge, I would create a snow globe.  I had a lovely tear-drop shaped glass honey jar.  I had decided that this bottle should become a penguin.   I wanted to leave the belly area of the jar open and have the inside be a snow globe.  At first I had thought I would have perhaps a Christmas tree inside his belly with some fish and snowflakes swimming around.  When I thought more of the snowflakes, I thought of putting a snowman inside his belly.  But then I thought, why would anything like a tree or snowman be inside a penguin's belly?  This is where my brothers' story comes in to play.


One summer when I was little, probably in the 5 to 6 year range, my family had gathered at my grandparent's house for a picnic.  We were all enjoying eating large slices of watermelon and spitting the seeds out into the yard.  I was eating my slice of watermelon and I accidentally swallowed one of the seeds.  I mentioned that I had swallowed a seed and my brothers pretended to be really concerned, and they said something like "Well you know what that means don't you? Your belly will get big and fat because you'll start growing a watermelon in your tummy."  I'm sure I'm not the first child to be told this tale, and surely not the last.  So my ah-ha moment with the penguin idea was to turn that tall tale into a story of eating snowflakes:  Poor Penguin so enjoyed catching snowflakes on the tip of his tongue and eating them that he didn't heed his older sibling's warning that he would grow a snowman inside his belly and now look at what has happened!


The snowman is polymer clay sculpted over some aluminum foil.  A bed of snow fills the bottom of the jar, and snowman is secured onto the snow with a small metal rod and some liquid polymer.  They are secured to the inside of the jar with epoxy.  The penguin is a glass tear drop shaped jar that has been covered with polymer to create the penguin.  About 20 small polymer snowflakes were made and they are inside the snow globe area.  One of the polymer snowflakes is in the beak of the penguin, as if this is the last of his captured snowflakes.


The snowglobe is filled with distilled water, vegetable glycerin, the polymer snowflakes and some white glitter.  The bottom of the penguin is embossed with a snowflake and my tiny signature stamp.


The size of this piece is about 6" tall, about 4" wide and 3 1/2" deep.  You can see the scale of him in the photo of my hand holding him below.  The head of the penguin completely unscrews to allow for refilling of the water solution. 


He was so fun to make; after the acorn idea and this one, I am now saving interesting jars for future projects and other ideas... this could become a new storage problem. ;)  What do you think about my latest little creation? 


Voting for the new challenge will, as always, begin on the first of the month (December 1st 2013) and ends at midnight on the 7th of December.  I'll try to remember to post a reminder with the link and a photo of the other entries here, but can't make any promises... as always December looms heavy with gift creating responsibilities and projects galore!