Friday, May 23, 2014

Art Deco Dreams

My favorite two design styles are the Art Nouveau and Art Deco periods. (If you're here in search of my Bead Soup reveal, please scroll down to the next post or find it here)  My latest polymer project proved difficult, simply because I love both of these styles and I had many ideas and inspiration.My guild's challenge theme for June 2014 is Art Deco/Art Nouveau, hence my dilemma.  I'm actually more drawn to the Art Nouveau style, and I had originally had something else entirely in mind when I stumbled upon this fantastic bottle at my local Goodwill:


This bottle screamed Art Deco to me.  Actually, as it sat on the shelf at the Goodwill it called out to me, "you must use me for the Art Deco challenge"... really it did! ;)  I tried to ignore it, because well, I already had something else in mind for this project, but it sat there staring at me saying, "You can't ignore me, you know you must use me".  And so I brought it home.  This baby is big, with the globe stopper on top, it measures 16" tall, with the stopper pulled off, the bottle alone is 12.5" tall and about 6" in width at the widest point.  The cd in the photo above is for scale, to give you an idea of just how large this piece is. 

So I began by sketching out an idea.  I decided to stick with a traditional Art Deco palette in peachy/coppery tones. I started out with the first layer, covering the tear drop shapes with a blend of translucent premo mixed with a tiny bit of pearl white and a lot of copper metal leaf. For the other areas of the bottle's first layer, I chose premo copper straight from the package.  I cut some circular shapes and a line connecting them down the centers out of the teardrop areas and put it in for the first cure:


After a nice sanding to get rid of any bumpies, during which the cut circles popped off of the piece, I worked on building the next layer.  Using the half circle shape on my extruder, the extruded lengths were used to frame the teardrop shapes in a blend of premo copper, sienna and red.  A cut pattern of radiating rays and circles (in premo bronze mixed with translucent) was put in place to decorate the copper areas.  And a large circle was placed around the top... in it went for a 2nd cure: 


 The next step was to add more circles around the top, cover the bottle's lip and to cover the bottom.  I also had to cover and decorate the globe shaped stopper.  The top 1/3 of the stopper had a beautiful pattern of graduating rings, which I wanted to keep uncovered.  I used the translucent/metal leaf blend, the copper premo and the bronze/translucent blend for the base layer of the stopper.  The cut decorations on the stopper were also done in the bronze/translucent blend.  


 After the 3rd cure, I coated the entire piece with liquid polymer and hit it with the heat gun.  A fourth and final bake to ensure that it was fully cured, and it's finished!  I didn't want a high gloss sheen on this one, so I didn't sand or buff any further, I quite like the semi-gloss finish that resulted from the liquid polymer glazing.  I was going to glue the circle shapes back into place in the teardrop areas, but I like it better as open glass, besides it mimics the open glass as on the top of the stopper. 


Once again, I'm fairly happy with this project.  But it's not one that I feel I need to keep, so it will likely be going into my etsy shop, unless the hubby protests! ;)   What do you think?  Let me know in the comments, and tell me what's your favorite time period for style and decoration?  Voting for this challenge will open on June 1st and will run through June 7th midnight EST.  I'll try to remember to post a reminder here with the link!

Friday, May 9, 2014

8th Annual Bead Soup Blog Party Reveal

The day has finally come for the Bead Soup Blog Party (BSBP) Reveal.  I blogged about the BSBP when my soup arrived in the mail from my partner, and again when my partner got my soup.  You can find those posts here and here.  So, to recap, this is the soup I received:

I created a bunch of pieces, using most of the soup ingredients.  I started on the focal, the curved copper band with swirls and painted coloring.  As beautiful as this focal is, it proved a challenge for me to use it.  The reason for this is that I'm mostly a necklace girl.  This focal was simply made for being a bracelet.  I really tried hard to think of how I could make this into a necklace focal, but in the end I made it what it wanted to be, a bracelet.  I also incorporated the silk sari fabrics into this and 2 of the pink shell beads...  I had some vintage buttons that became the beads for the bracelet band.  Here are some shots of that piece:


I had this pink cord necklace that perfectly matched those pink shell beads... I also had a pendant that I had made out of polymer clay which had that same pink color, and those items were what created the second piece.  From the soup, the only items I used in this piece are the pink shell beads:


Next up, I had to use the clasp.  I didn't want to use the clasp in the same piece as the focal because I have an aversion to mixing metals.  The metals in the focal piece were copper and the clasp is silver tone.  The clasp also is in the whimsical shape of butterflies.  I decided to do a spring inspired piece using most of the multicolored crystal beads that were found in my soup, and I decided to make a butterfly pendant using my upcycled materials.  This butterfly pendant is created with fused plastic snack bags:


Next, I still had more of those fun, bright pink shell beads to use, so I decided to pair them with one of my dyed tyvek pendants as seen here:


The soup included a bunch of pearls, some glass ones and some freshwater pearls.  They were all in various shapes, sizes and colors... and some of them were drilled off center.  I decided to pair them with this great neutral variegated cording that I had.  I also decided to go for another bracelet design and earrings (another rarity for me).


Next I zeroed in on a small grouping of pale green cube beads (possibly fluorite).  I decided to do a boho look necklace with these pairing them with varying strands, disc beads from my stash and some garnet colored glass beads from my stash, and the focal is a multi-colored polymer clay bead:


There were 4 large moss agate (?) beads in my soup which I decided to pair with a polymer pendant that I made last year, which was sitting around waiting for inspiration.  The pendant was created while playing with Lynda Moseley's controlled marbling technique.  I pulled in some coral beads to draw on the orange tones in the pendant:


And finally, I wanted to use at least one of those metal sheets that I was sent in my soup.  Now, they were quite a challenge.  First, I'm no metalsmith... but I do like to play around and experiment with things.  These babies are big, about 3" by 4", and the metal is quite heavy.  I don't have any tools that can cut through that, nor do I have any great shaping tools.  But I do have a vice and decided today at the last minute to play with one of the plates to see what happens. I paired my bent up piece of metal with some thick grey knit cordage, its almost like a scarf necklace:


I still have some ingredients left over for further play! Plenty of the silk sari fabric, a couple more of the various colored crystal beads, the big green lampwork bead, and still a few more of the pink shell beads... oh, and the other 3 metal plates (though I think the one with the best impression will become a polymer clay texture plate). ;)

I had so much fun creating things with the soup.  It was a definite challenge for me, as all of the ingredients were items I wouldn't normally have acquired for my own supply, so it really pushed me to work with things out of my "norm".  I'm considering making 2 of the pieces part of my "permanent collection", so I think it's safe to say that I created pieces with which I'm quite pleased!  Please do have a look at my partner's blog to see what she did with the soup I sent her.  My partner is Arlene Dean from A Glass Bash, and you can find her reveal here.   Here is the soup that I sent to her:


Thank you Arlene!  There were close to 500 other participants in this blog party, please take some time to check out some of the other soups and reveals!  You can find the full list of participating artists, with hotlinks to their blogs here.  Many thanks to Lori Anderson for organizing everything!! Oh, and leave me a comment and let me know what you think about my creations! :)

Friday, April 25, 2014

Labor of Love

My latest piece was truly a labor of love.  I wonder if I jinxed myself in the post about my last piece, when I said it just went together without a hitch.  Not so with this one.  The May challenge for my guild is the theme of bowls.  Immediately I knew 2 things, I wanted to make a yarn bowl and I wanted it to have a different design, perhaps 2 levels that were separated by space.  I made some sketches and came up with a design and shape that made me swoon.  I decided to use hammered metal spirals to support the upper level of the bowl.  While this idea was fun, it proved a challenge.  In hindsight I would have made the bowl and drilled holes into it for the metal supports.  I had actually considered doing this, but was wary of how thick I'd have to make it for drilling and was worried that I would drill through the bowl, so instead I tried to build the bowl around the metal supports.


I began by making a first layer of the basic shapes I needed to create the look I wanted.  I used a glass vase to form my shape.  After the first cure I wanted to sand down any bumpies, and in doing so cracked the top piece right in half.  I guess it wasn't cured well enough, as that should not have happened.  Super glue to the rescue and onto the second layer for strength.  This layer went off without a hitch.  Next up, was to build the hammered metal spirals -  I shaped these with my round nose pliers and hammered them on my anvil, and during that process I once missed and hit my thumb with the hammer.  Did I mention that this piece was a labor of love? ;)


After a few choice words and successfully forming and hammering all of the spirals I glued them to my pieces, which was a feat in and of itself!  Once I had them glued, I had to create another base layer to bring the clay to the same level as the metal.  In this next curing the cracks started.  I had 3 cracks from where the metal was straining while the piece rested on the vase for support.  I patched up the cracks, added another layer and back into the oven for another cure.  This time the cracks were healed, but I still wanted one more layer.  Imagine my disgust after the additional layer was cured and I pulled the piece out to find 3 cracks in the same general area as before!  One more patching and a layer of black lpc fixed that issue.


Next I gave it a good sanding all over to eliminate the bumps and fingerprint marks, then another layer of lpc for one more full polymer coating.  I wanted a surface treatment on the bowl that was just as unique as the shape, so I opted for a version of what I call impasto polymer technique, which I did in the Premo Bright Green pearl color, straight from the pack because I love that color so much. 


One final curing to harden the surface treatment, as I held my breath and watched over like a mother hen for fear of more cracking.  It survived with no issue! YAY!  I gave it a nice coating of a polymer gloss sealer for extra protection.  The interior bottom of the bowl, I forgot to mention, is a slab of mokume gane polymer done in black, silver, wasabi pearl and white.  You can get a glimpse of that here:


As I said, the idea for this was to be a yarn bowl, and the 2 layers askew were meant as a place for the knitting needles to rest as seen here:


And the yarn is meant to feed through the metal spiral like this:


Yes indeed, this one was a labor of love.  Lots of work went into it and while it is not perfect, I do love this piece.  The design of it is very "me" and I was so pleased with how the surface treatment turned out considering that part was totally unplanned.  I love it when pieces come together with something that just "happens"! :)  If I ever revisit this project again, I will definitely make the base parts full thickness first and then drill the holes for the wire support, that's the lesson for this one.  But overall I'm quite pleased!  What do you think of my funky bowl?  Have you ever had a project that kept giving you problems all through construction but you stuck with it and it turned out as good as you had originally hoped? Tell me about it in the comments!

Friday, April 4, 2014

My Vegetarian Pizza recipe, it's in a contest... I'd appreciate your votes!

I'm finally posting about this on the final day of voting for this contest, but better late than never.  I entered a recipe contest for a vegetarian/vegan meat substitute called Neat.  This stuff is awesome.  I've made meatballs with it that seriously taste just like the real deal!  Anyway, they had a call for entries, and they were requesting creative recipes.  Because I've never seen a vegetarian or vegan pepperoni that didn't have soy (another thing I don't eat), I decided to send them my Neat-eroni Supreme pizza recipe.  The creator and owner of the company already chose the #1 and 2 recipes, but I'm in the running (with 4 other recipes) for the #3 slot, which will be determined by a public vote.  Voting ends tonight (Friday April 4th) at midnight EST.  So, if you have a facebook account, you can vote for my recipe here: http://eatneat.com/blog/the-neat-est-dish-fan-vote-3rd-place/  Go to the bottom of the neat page and you'll see "Stop back on our Facebook page to vote for your favorite dish!" you can click on that link and it will take you to the facebook poll.   Pretty Please!!   Thanks! ...and here's my recipe:


Vegetarian neat-eroni Supreme Pizza 
Make the Neat-eroni ahead of time to allow it to cool enough for slicing.

Neat-eroni:
Ingredients
1 package Neat brand original flavor meat substitute
¾ c. Garbanzo bean flour (I use Bob’s Red Mill brand)
2 ½ c. water
1 T avocado oil
1 ½ t. liquid smoke
1 t. organic barbecue sauce (I like Annie’s)
1 T. paprika
¼ t. to ½ t. cayenne (depending on how hot you like it)
1 t. sea salt
1 T. cane sugar
1 t. whole anise seeds
1 t. fennel seed
1 t. whole red or black peppercorns
1 t. green peppercorns
1 t. crushed red pepper

Method:
Bring the 2 ½ c. water to boil over medium high heat.  Whisk the garbanzo bean flour into the boiling water.  Cook for one minute stirring constantly.  Lower heat to medium low and continue cooking for 5 minutes.  Set aside and let cool slightly.  Either with mortar and pestle or with a coffee grinder, grind anise seed, fennel, peppercorns and red pepper flakes.  In a bowl, combine the cooked garbanzo bean mixture with the packet of neat, avocado oil, liquid smoke, barbecue sauce and all spices.  Mix well.  Divide mix into 2 or 3 equal portions, spoon each portion onto a well oiled sheet of heavy aluminum foil.  Wrap each portion into a log and wrap tightly by twisting the ends of the foil.  Using a steamer insert, steam in a pot for 45 minutes.  Let cool.

To make the pizza:
Ingredients:
1 batch pizza dough (see link below)
pizza sauce (my original recipe below)
neat-eroni – sliced thin
your favorite toppings (I used organic green pepper, organic red onion and organic mushrooms)
grated romano cheese (Locatelli is best)
grated mozzarella cheese
oregano
 
Method:  
Make the dough first, using your favorite pizza dough recipe.  This is the best pizza dough recipe I’ve ever found, and its what I use faithfully for a great pizza:  http://www.frenchlogic.com/2011/04/homemade-pizza-and-dough-recipe.html  While the dough rises, make the sauce (see below) and chop the veggie toppings and neat-eroni in thin slices.  Once dough has risen to doubled in size, punch down and shape into pizza crusts (if using the dough recipe in the link I’ve added, it yields 3 pies).  Spread pizza sauce on crusts and top with neat-eroni and veggies, sprinkle with both cheeses and oregano.  Bake at 500˚ until crust is browned and cheese melted to your preference.
 
To make the Pizza sauce:
Ingredients:
2 24 oz. jars pureed tomato
1/3 c. avocado oil
2 t. garlic
1 t. salt
1 T. sugar
1 T. oregano
1 t. basil
Add all ingredients to sauce pan and cook over medium heat for 30 minutes, or until oil has been incorporated into the tomato.  Adjust seasoning to your preference.

If you make the recipe, leave me a comment and let me know how you like it!  And thanks for any votes! :)

Thursday, April 3, 2014

Voting time!

Voting time is here! ...actually we're already 3 days into voting time!  You have until midnight on April 7th to cast your vote, so please head over to the PCAGOE blog and choose your 3 favorite entries!  This month's participants really pulled out the stops with so many creatively engineered and carefully constructed pieces.  I know it was a tough choice for my top 3 votes... Have a peek at all of the lovely artwork for this month:


Remember, you could win a prize for voting, so head over to the blog and cast your vote!

Saturday, March 29, 2014

Soup Mail Received

After two trips through the mail, the bead soup I created for my BSBP partner (Arlene Dean of a glass bash) is finally in her hands!  While my package was in transit from my home to hers, she heeded the call to help out family in another state.  So, when she realized how quickly the reveal date will be looming upon her, she enlisted her family back at her home to forward the package to where she is staying.  I'm relieved that she finally has it!

So, here's a photo of the entire soup I sent:


As you can see, I was thinking in terms of burgundy reds, purples and gold.  I included: some yardage of silk ribbon that is dyed in purple to red gradations with sparks of gold thread, there is some yardage of both a grey color and a red tone of bamboo cordage, some gold tone chain, french ear wires, 2 brass filigree pieces, some czech glass beads in vials - in tones of red to lavender, yellow gold, and purple to black, the beads on strands are - one strand of large teardrop shaped purple agate, the next row are round purple and rose colored marble stone beads, some clear glass teardrops, two strands of faceted crystal beads that have burgundy/magenta sides, a strand of rose colored faceted crystal beads and a strand of gold colored freshwater pearls, and handmade components of polymer clay flower blossom headpins, a fan shaped dyed tyvek focal, a polymer fan shape with donut clasp, and a handful of rustic polymer disc beads.

Here's a shot of the handmade components:


 The first pieces I made (and which set the tone for the color scheme) were the flower bud shaped headpins which I made using the tutorial from polymer artist Lillian de Vries, her lovely blog is called "at the clayground".  You can find her tutorial for these flower beads here.  Here's an up-close look at those flowers:


My partner had commented that she really liked my tyvek flowers and shells.  So I had originally intended to try something new, in creating a dyed tyvek flower surrounding one of these polymer buds.  Well, when it was finished, I wasn't as happy with it, so I decided to make her one of the shell/fan shaped pieces, sticking to a color scheme of burgundy/magenta/pinks and purples with accents of gold.  Here's the final focal that I created using cut, formed and heat fused upcycled tyvek that was hand dyed:


I wanted to make some polymer beads in the same tones of the flower blossoms, so I made these rustic shaped discs in the same hues and added gold to their edges:


And finally, the clasp I made in a polymer fan shape with a donut connector in the same color tones as the flower blossoms too.


I really loved this soup and wanted to keep it for myself, but I am afraid my funky style will prove to be a challenge for my partner.  When we began our dialog, she didn't give me any information on the types of things she likes, and her blog doesn't really give me much to go on either... she just said that she doesn't like to provide too much information so that she can have a challenge.  So, I made and curated a soup that I would love to receive. So far, my partner has said that she really likes the flower headpins, but not much else about it.. so hopefully those pieces will provide enough inspiration to figure out how to utilize the rest of the soup ingredients.  I gather that my style and my partner's style are likely quite different and I believe that using the both soups will prove to be a challenge for us both!  Anyone who knows me, knows that I love the creativity that comes from a challenge, so I am really looking forward to both my creating and seeing what my partner makes of my funky collection to her.  The reveal date is May 5th, so be sure to check back to see what everyone in the Bead Soup Blog Party has created!


Tuesday, March 25, 2014

Diamond in the rough

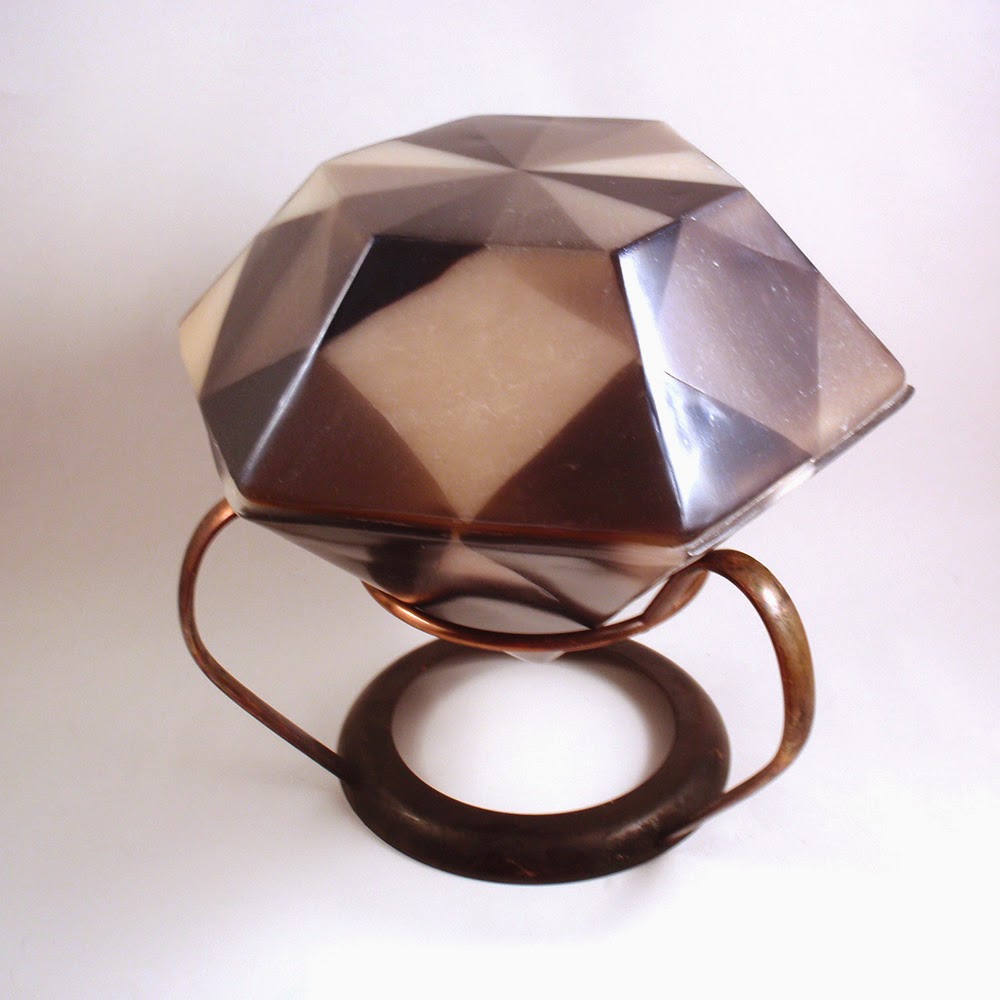
I had decided to do something with a different shape for the April PCAGOE (Polymer Clay Artists Guild of Etsy) challenge.  The theme this month is "containers".  I had this wooden form in the shape of a hexagon that tapers to a point (the shape of the bottom of my piece).  Something in the shape reminded me of a faceted diamond and thus the wheels went spinning! 


My first job was to cover the wooden pyramid with translucent white clay.  That was then covered with gradients of black to translucent white cut into triangular shapes to give the feel of light reflecting on the facets of a stone. 


The bottom part, having been cured twice, was finished when I set to work on the top.  I had figured if I covered just the widest part of the wooden form up only part of the way, this would create the walls of my lid and should sit easily on top of the base, but how to get the flat piece on the top of the lid?  Well, I just happened to have a big Fat Daddio's hexagon cutter which I used to first determine how far up the wooden form the lid walls needed to come and then cut out a flat piece of translucent white clay.  After curing both the lid walls and the flat hexagon, I glued the two together.  Because I wanted the lid to sit securely in place, I needed to build up a lip inside the lid's mouth, so I did that in the next baking and added another layer of translucent to give more strength to the lid.  After another curing, I then mapped out and placed layers of black to translucent white value in triangle and polyhedron shapes to mimic light refracting off the facets of a stone.


After curing a final time, I sanded and polished for hours.  I was almost afraid I wouldn't make the deadline, but I squeeked it in with an hour and a half to spare! The metal holder was something I hadn't originally planned, but when I had considered this piece laying on it's side and the potential of the lid falling off from the angle which it had to sit, I decided only yesterday to go to my local thrift store.  It seems that whenever I am in need of something specific, serendipity or my fairy god mother, just makes it appear at my thrift store.  I'm quite lucky in that regard.  I had wanted something gold.  I think this piece had once belonged to a copper coffee carafe, it is an aged copper metal (close enough!).  And the hole and three support curves were perfect for my 6 sided geometrical shape!  

While the piece doesn't really scream faceted stone, as the original thought had been, I do like the minimalist geometric shape of this piece and the design interest which the varying values in shapes lends to the whole.  If I were to recreate this piece I would construct the bottom in similar fashion to the top, with more solid values instead of gradations... lesson learned.


Another interesting thing with this piece, is that it can be flipped around to have the lid be the bottom and the bottom become the lid.  With this switch, it can even be simply set on a table without the metal holder.  I like it both ways, but think I prefer my originally intended positioning idea.  Though there are a few things I would change to remake this piece, I am quite happy with how it turned out.  I do think it's a deviation from my typical style, but that's just my opinion, others might see this as fitting right in with the rest of my work....  And I think it is an example of how my handwork is getting better with executing my crazy ideas.  I noticed with this piece, and with the last, that things just seem to fall in place and work out the way they were intended with little struggle, which has not always been the case in my history.  I know that in setting a goal for myself, to complete a full year of my guild's challenges (I'm now halfway into my 2nd year of continuous entries), it has strengthened my skills and honed my idea process, for which I am so grateful.


What about you?  Is there anything that you have done to sharpen your talents or hone your idea process?  If so, please share with me in the comments!  And let me know what you think of this new piece!

Voting for this challenge opens on April 1st and will run through April 7th at midnight.  I'll be sure to post again here, as a reminder!