Showing posts with label bohemian. Show all posts

Monday, July 25, 2016

Sea Tossed Shell Necklace

It's been a rough month both physically and emotionally, for varied reasons. I nearly bailed on the PCAGOE challenge for August. I think I'm close to a 3 year streak for consecutive months of entries, so I really hated to miss a month. I haven't been in the studio since last month, and I could feel edginess setting in... this is never a good thing! Luckily, I manage to squeak in some time in the studio last night and today to come up with an entry. The challenge theme for August 2016 is "Beach".

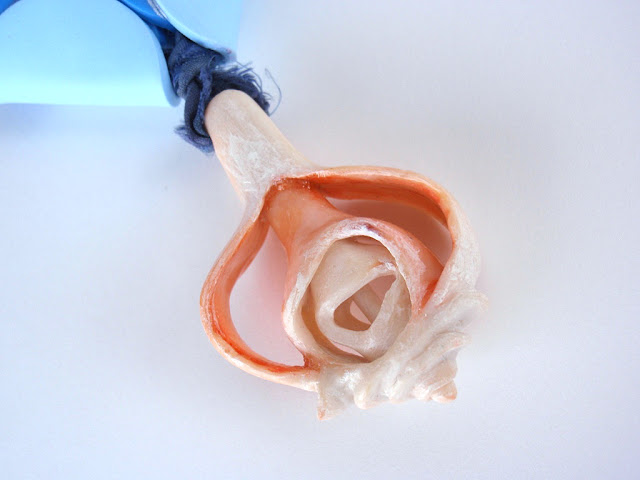
When I originally thought about what I might do for this theme, I had planned to do a piece with a whelk shell and I intended to either film or take snapshots of the process. The plan was to embed a tutorial on my blogpost about the piece. Alas, with the lack of time and last minute studio work, I did not have a chance to do a video or photos, plus, the shell I decided to create is different from the whelk shell that I made for my She Sells Seashells Fairy House, and so the creating of it was another session of trial and error. 


Sometime yesterday I had resigned myself to skipping this challenge, because I didn't have any ideas for this shell piece... I simply wanted to make a seashell but didn't know how that shell would be used. Then I dug around in my stock of unassembled pieces, that I have in a bin, and found the 2 blue circle stacked beads that I had left over from my Cloudy with a Mix of Tyvek Necklace. These blue beads kind of reminded me of cascading waves, or even fish scales... and I started thinking about a necklace that would incorporate these beads and a shell pendant. I didn't want the shell to be too dimensional on the wearer, so I decided to create a worn shell, one that was tossed about and weathered by the ocean. I liked the idea of being able to see the various layers of the interior spiral. 


I set about making the shell with a blend of Premo translucent and Premo white. This piece was created in layers and various bakings, starting with the thin core first and working out to the outer layer last. After all the layers were attached and fully cured, I then used alcohol inks to add some coloring and and white acrylic paint to give a water-weathered impression to some of the areas The inner salmon layers were also treated to a thin layer of liquid pc and a shot with the heat gun to give a glossy look, similar to that of a real seashell.


Next I drilled a hole in the shell bead and strung it and the blue beads onto a strand of silk sari. The sari necklace is made to be tied to secure it, and so 2 blue glass beads were added to the ends to weigh them down. I think the sari strand gives a nice boho feel to the piece.


Excuse the last photo, of me modeling the necklace, I ran out of daylight and couldn't get the focus as sharp as I want. I'll try another day this week, to take a better photo and will update the post with the new photo as soon as I can...

Overall, I'll pretty happy with this quickie project. I do love how the shell turned out. I'm not convinced that I like it with the blue beads, at least not as much as I thought I would. Someday I hope to make a tutorial on how to make the whelk shells. If you're a polymer artist, is that something you'd be interested in learning? What do you think about the contrast between the blue beads and the shell pendant? Would you swap the blue beads for something else? Leave me a comment below and let me know what you think of my Sea Tossed Shell necklace.

Voting will open for this challenge on August 1st and will run through till August 7th at Midnight. As always, I'll try to post a reminder here on the blog!

Sunday, October 25, 2015

Boho Beach Glass Necklace - a back-up plan

Sometimes things just don't work out the way you think they will. This month's challenge project for the Polymer Clay Guild of Etsy (PCAGOE) was one of those occasions. I had whittled away the month focusing on household issues and only began to work on my challenge project on Friday.

After spending the better part of the day, conjuring up my fabulous (if I do say so myself) idea... after the first baking of the surface design layer, my intended project was in ruins. The piece I had been working on is a mixed media piece, (I'm keeping "what it is" a secret for now, because I feel certain my blog readers shall see it eventually). I will say that it is a large item, about 14" by 12". Although my oven is large enough to hold said piece, I didn't have a large enough substrate on which to bake the flat piece. I opted to put it on parchment paper, then on top of the largest flat board I could find in my studio that would fit in my oven, but still the ends were about a 1" overhang. This, plus (probably) a failing oven thermometer led to the demise of my glorious idea. When removed from the oven, areas of cracking appeared because of my 2 previously mentioned issues. Reminder to self, it's time to purchase 2 digital thermometers. The cracking was all over the key surface design, which I had painstakingly mapped out in polymer over the course of a couple hours that day. The ruin of which, rendered the entire surface utterly destroyed. I had to then peel off the "design" layer, which is now contained in 2 ziplock baggies for potential future upcycling, to at least preserve the base of the piece which I had put together over the course of that morning. To start over with the design layer again would take too much time and the other problem is, it was A LOT of polymer, almost a whole 1 lb. of clay! To say I'm very unhappy about that is an understatement. But, lessons learned... I went to the thrift store and now have a piece of glass to bake on that is large enough for this project, and I will be getting a new thermometer to resolve the other issue. I didn't have enough time (or frankly, clay in the right colors) to finish my original project, so I had to come up with something else quick. Luckily this month's challenge theme is wide open for interpretation, the theme is "Personal accessories", and using up previously made jewelry components to create a new piece would fit the bill.


Back when I created my faerie light house, I made extra pieces of faux sea glass, that I had in reserve to use for jewelry. I also had just recently dabbled with a tutorial and created these organic shaped pieces that are meant to mimic bits of coral and a shell. Both the sea glass and the organic shapes were created using the tutorials (Faux Glass effects and Organic beads) from Ginger Davis Allman of The Blue Bottle Tree. Ginger's tutorials are some of the best ones out there, all beautifully detailed in written instruction and photo examples. And perfect for all levels of experience. You can find the tutorials in Ginger's online shop, she even has 2 great bundles where you can get 3 tutes for less than you would have to pay for all of them when purchased separately! Here's a close-up of those handmade beads...


When I realized that I would need to resort to a back-up plan, my mind went to these previously  made pieces. I decided to create a boho beach necklace... sea glass, coral, shell, and matching silk fabric... these colors and components reminded me of something a mermaid might wear, or at least a bohemian beach babe. ;)   I have a stash of these lovely robin's egg blue pearl antique buttons that went perfectly with the colors, so I decided to incorporate some of those in this piece.


So, after all the frustrations from the original idea not working out, this challenge entry turned out quiet lovely (if I do say so myself) :)  To make a necklace was NOT as I had originally intended... but that's okay, I will revisit that other idea another day. For this day, I'm thankful to have created such a lovely neckpiece. I'm tempted to keep this one for myself, but do think that I will be posting it in my etsy shop.


What do you think about my boho beach necklace? Have you had projects that you just had to abandon to move onto another more efficient idea? Did you revisit the original idea eventually? I'd love to hear what you have to share... leave me a comment below! Remember, the voting for this challenge will begin on November 1st and will run through till midnight November 7th. I'll post a reminder here at the blog. And I'll leave you with the back side view of this piece:


Friday, May 9, 2014

8th Annual Bead Soup Blog Party Reveal

The day has finally come for the Bead Soup Blog Party (BSBP) Reveal.  I blogged about the BSBP when my soup arrived in the mail from my partner, and again when my partner got my soup.  You can find those posts here and here.  So, to recap, this is the soup I received:

I created a bunch of pieces, using most of the soup ingredients.  I started on the focal, the curved copper band with swirls and painted coloring.  As beautiful as this focal is, it proved a challenge for me to use it.  The reason for this is that I'm mostly a necklace girl.  This focal was simply made for being a bracelet.  I really tried hard to think of how I could make this into a necklace focal, but in the end I made it what it wanted to be, a bracelet.  I also incorporated the silk sari fabrics into this and 2 of the pink shell beads...  I had some vintage buttons that became the beads for the bracelet band.  Here are some shots of that piece:


I had this pink cord necklace that perfectly matched those pink shell beads... I also had a pendant that I had made out of polymer clay which had that same pink color, and those items were what created the second piece.  From the soup, the only items I used in this piece are the pink shell beads:


Next up, I had to use the clasp.  I didn't want to use the clasp in the same piece as the focal because I have an aversion to mixing metals.  The metals in the focal piece were copper and the clasp is silver tone.  The clasp also is in the whimsical shape of butterflies.  I decided to do a spring inspired piece using most of the multicolored crystal beads that were found in my soup, and I decided to make a butterfly pendant using my upcycled materials.  This butterfly pendant is created with fused plastic snack bags:


Next, I still had more of those fun, bright pink shell beads to use, so I decided to pair them with one of my dyed tyvek pendants as seen here:


The soup included a bunch of pearls, some glass ones and some freshwater pearls.  They were all in various shapes, sizes and colors... and some of them were drilled off center.  I decided to pair them with this great neutral variegated cording that I had.  I also decided to go for another bracelet design and earrings (another rarity for me).


Next I zeroed in on a small grouping of pale green cube beads (possibly fluorite).  I decided to do a boho look necklace with these pairing them with varying strands, disc beads from my stash and some garnet colored glass beads from my stash, and the focal is a multi-colored polymer clay bead:


There were 4 large moss agate (?) beads in my soup which I decided to pair with a polymer pendant that I made last year, which was sitting around waiting for inspiration.  The pendant was created while playing with Lynda Moseley's controlled marbling technique.  I pulled in some coral beads to draw on the orange tones in the pendant:


And finally, I wanted to use at least one of those metal sheets that I was sent in my soup.  Now, they were quite a challenge.  First, I'm no metalsmith... but I do like to play around and experiment with things.  These babies are big, about 3" by 4", and the metal is quite heavy.  I don't have any tools that can cut through that, nor do I have any great shaping tools.  But I do have a vice and decided today at the last minute to play with one of the plates to see what happens. I paired my bent up piece of metal with some thick grey knit cordage, its almost like a scarf necklace:


I still have some ingredients left over for further play! Plenty of the silk sari fabric, a couple more of the various colored crystal beads, the big green lampwork bead, and still a few more of the pink shell beads... oh, and the other 3 metal plates (though I think the one with the best impression will become a polymer clay texture plate). ;)

I had so much fun creating things with the soup.  It was a definite challenge for me, as all of the ingredients were items I wouldn't normally have acquired for my own supply, so it really pushed me to work with things out of my "norm".  I'm considering making 2 of the pieces part of my "permanent collection", so I think it's safe to say that I created pieces with which I'm quite pleased!  Please do have a look at my partner's blog to see what she did with the soup I sent her.  My partner is Arlene Dean from A Glass Bash, and you can find her reveal here.   Here is the soup that I sent to her:


Thank you Arlene!  There were close to 500 other participants in this blog party, please take some time to check out some of the other soups and reveals!  You can find the full list of participating artists, with hotlinks to their blogs here.  Many thanks to Lori Anderson for organizing everything!! Oh, and leave me a comment and let me know what you think about my creations! :)