Showing posts with label sea. Show all posts

Monday, July 25, 2016

Sea Tossed Shell Necklace

It's been a rough month both physically and emotionally, for varied reasons. I nearly bailed on the PCAGOE challenge for August. I think I'm close to a 3 year streak for consecutive months of entries, so I really hated to miss a month. I haven't been in the studio since last month, and I could feel edginess setting in... this is never a good thing! Luckily, I manage to squeak in some time in the studio last night and today to come up with an entry. The challenge theme for August 2016 is "Beach".

When I originally thought about what I might do for this theme, I had planned to do a piece with a whelk shell and I intended to either film or take snapshots of the process. The plan was to embed a tutorial on my blogpost about the piece. Alas, with the lack of time and last minute studio work, I did not have a chance to do a video or photos, plus, the shell I decided to create is different from the whelk shell that I made for my She Sells Seashells Fairy House, and so the creating of it was another session of trial and error. 


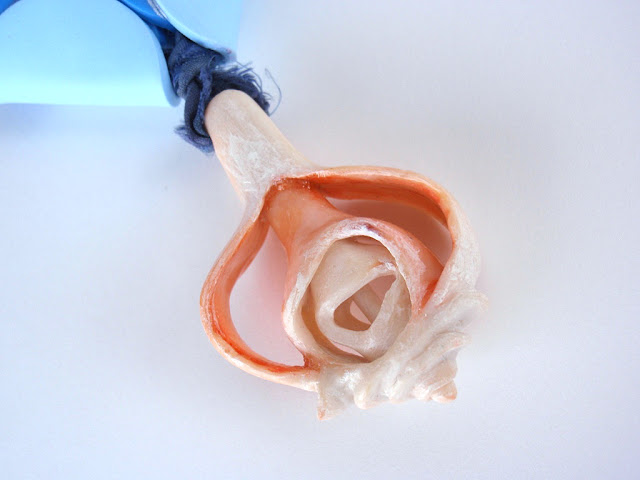
Sometime yesterday I had resigned myself to skipping this challenge, because I didn't have any ideas for this shell piece... I simply wanted to make a seashell but didn't know how that shell would be used. Then I dug around in my stock of unassembled pieces, that I have in a bin, and found the 2 blue circle stacked beads that I had left over from my Cloudy with a Mix of Tyvek Necklace. These blue beads kind of reminded me of cascading waves, or even fish scales... and I started thinking about a necklace that would incorporate these beads and a shell pendant. I didn't want the shell to be too dimensional on the wearer, so I decided to create a worn shell, one that was tossed about and weathered by the ocean. I liked the idea of being able to see the various layers of the interior spiral. 


I set about making the shell with a blend of Premo translucent and Premo white. This piece was created in layers and various bakings, starting with the thin core first and working out to the outer layer last. After all the layers were attached and fully cured, I then used alcohol inks to add some coloring and and white acrylic paint to give a water-weathered impression to some of the areas The inner salmon layers were also treated to a thin layer of liquid pc and a shot with the heat gun to give a glossy look, similar to that of a real seashell.


Next I drilled a hole in the shell bead and strung it and the blue beads onto a strand of silk sari. The sari necklace is made to be tied to secure it, and so 2 blue glass beads were added to the ends to weigh them down. I think the sari strand gives a nice boho feel to the piece.


Excuse the last photo, of me modeling the necklace, I ran out of daylight and couldn't get the focus as sharp as I want. I'll try another day this week, to take a better photo and will update the post with the new photo as soon as I can...

Overall, I'll pretty happy with this quickie project. I do love how the shell turned out. I'm not convinced that I like it with the blue beads, at least not as much as I thought I would. Someday I hope to make a tutorial on how to make the whelk shells. If you're a polymer artist, is that something you'd be interested in learning? What do you think about the contrast between the blue beads and the shell pendant? Would you swap the blue beads for something else? Leave me a comment below and let me know what you think of my Sea Tossed Shell necklace.

Voting will open for this challenge on August 1st and will run through till August 7th at Midnight. As always, I'll try to post a reminder here on the blog!

Sunday, October 25, 2015

Boho Beach Glass Necklace - a back-up plan

Sometimes things just don't work out the way you think they will. This month's challenge project for the Polymer Clay Guild of Etsy (PCAGOE) was one of those occasions. I had whittled away the month focusing on household issues and only began to work on my challenge project on Friday.

After spending the better part of the day, conjuring up my fabulous (if I do say so myself) idea... after the first baking of the surface design layer, my intended project was in ruins. The piece I had been working on is a mixed media piece, (I'm keeping "what it is" a secret for now, because I feel certain my blog readers shall see it eventually). I will say that it is a large item, about 14" by 12". Although my oven is large enough to hold said piece, I didn't have a large enough substrate on which to bake the flat piece. I opted to put it on parchment paper, then on top of the largest flat board I could find in my studio that would fit in my oven, but still the ends were about a 1" overhang. This, plus (probably) a failing oven thermometer led to the demise of my glorious idea. When removed from the oven, areas of cracking appeared because of my 2 previously mentioned issues. Reminder to self, it's time to purchase 2 digital thermometers. The cracking was all over the key surface design, which I had painstakingly mapped out in polymer over the course of a couple hours that day. The ruin of which, rendered the entire surface utterly destroyed. I had to then peel off the "design" layer, which is now contained in 2 ziplock baggies for potential future upcycling, to at least preserve the base of the piece which I had put together over the course of that morning. To start over with the design layer again would take too much time and the other problem is, it was A LOT of polymer, almost a whole 1 lb. of clay! To say I'm very unhappy about that is an understatement. But, lessons learned... I went to the thrift store and now have a piece of glass to bake on that is large enough for this project, and I will be getting a new thermometer to resolve the other issue. I didn't have enough time (or frankly, clay in the right colors) to finish my original project, so I had to come up with something else quick. Luckily this month's challenge theme is wide open for interpretation, the theme is "Personal accessories", and using up previously made jewelry components to create a new piece would fit the bill.


Back when I created my faerie light house, I made extra pieces of faux sea glass, that I had in reserve to use for jewelry. I also had just recently dabbled with a tutorial and created these organic shaped pieces that are meant to mimic bits of coral and a shell. Both the sea glass and the organic shapes were created using the tutorials (Faux Glass effects and Organic beads) from Ginger Davis Allman of The Blue Bottle Tree. Ginger's tutorials are some of the best ones out there, all beautifully detailed in written instruction and photo examples. And perfect for all levels of experience. You can find the tutorials in Ginger's online shop, she even has 2 great bundles where you can get 3 tutes for less than you would have to pay for all of them when purchased separately! Here's a close-up of those handmade beads...


When I realized that I would need to resort to a back-up plan, my mind went to these previously  made pieces. I decided to create a boho beach necklace... sea glass, coral, shell, and matching silk fabric... these colors and components reminded me of something a mermaid might wear, or at least a bohemian beach babe. ;)   I have a stash of these lovely robin's egg blue pearl antique buttons that went perfectly with the colors, so I decided to incorporate some of those in this piece.


So, after all the frustrations from the original idea not working out, this challenge entry turned out quiet lovely (if I do say so myself) :)  To make a necklace was NOT as I had originally intended... but that's okay, I will revisit that other idea another day. For this day, I'm thankful to have created such a lovely neckpiece. I'm tempted to keep this one for myself, but do think that I will be posting it in my etsy shop.


What do you think about my boho beach necklace? Have you had projects that you just had to abandon to move onto another more efficient idea? Did you revisit the original idea eventually? I'd love to hear what you have to share... leave me a comment below! Remember, the voting for this challenge will begin on November 1st and will run through till midnight November 7th. I'll post a reminder here at the blog. And I'll leave you with the back side view of this piece:


Saturday, July 25, 2015

She sells seashells...

...down by the seashore.

Perhaps I've been daydreaming about a trip to the beach far too often this summer. When the time came to construct a fairy house for my (PCAGOE) guild's August challenge, I automatically began thinking about a fairy who lived at the beach. As a child, I was fortunate to have parents who would take us to the beach nearly every summer. As an adult, it hasn't been as easy to get to the beach every summer; in fact, it's been many years since I've felt the sand between my toes and the sea salt in my hair. I guess that's why every project I've done in the last couple months has had a beach/summer color palette. The ocean is calling me, and this is presently my only outlet.


It all began with a shell... at the start of this project, I had decided that my fairy would set up house in a whelk shell she had found on the beach. Well, after I created my little whelk shell, I loved it so much that I didn't have the heart to bury half of it in polymer sand, nor did I want to add a door or cut a hole in it for adding a window. I wasn't completely sold on this idea in the first place, so I gave the theme some more thought.


Above: Shell (before adding orange color and gloss to interior)
Below: finished shell


I considered abandoning the beach theme and doing a woodland fairy house. But I persevered and inspiration struck when I was brainstorming things one might find at a beach. I had wanted to incorporate polymer sea glass, because I adore sea glass. I came up with the idea of a sea worn bottle fully intact, yet partially covered with coral calcification and tiny seashells. This would be a fairy's lighthouse! Can you just imagine her magical light illuminating the inside of the bottle? The cap of the bottle can be removed, so one can insert a glow stick or small battery powered light to illuminate the bottle.


I decided that I would use the faux glass effect tutorial, by Ginger Davis Allman of The Blue Bottle Tree, to create the sea glass pebbles that would be the stepping stones to the door of the light house, and also to cover portions of the bottle that would become the lighthouse. I was so pleased with the effect of the faux sea glass. Ginger's tutorial is so well written and illustrated that it's perfect for all levels of experience, beginner through advanced; so if you love the look of sea glass, I highly recommend buying the tutorial. I wanted to incorporate tiny seashells encrusted in the coral on the bottle, and I wanted all pieces to be made from polymer, so I set to work and created some tiny horn, whelk, olive, scallop, oyster and snail shells. I used a white and translucent Premo mix and hand sculpted each shell, sometimes adding inks before sculpting, sometimes after sculpting. I was fairly pleased with my little handmade shells. You can catch sight of those tiny shells here:


The door was to be made of faux driftwood with the smallest of snail shells as a door knob. To create the door I used Premo Rhino colored clay which I sculpted in layers to give the look of water worn wood. After curing the door was antiqued with burnt umber water based oil paint, to bring out the details:


The faux coral was created with various items to give texture and indentations. I used a blend of Premo white and translucent, with some inclusions (scrap clay left over from a previous project). After curing, I gave a gentle antiquing to the coral parts by sparingly brushing the burnt umber water based oil and immediately rubbing with a wet cloth to give only the faintest color.


For a final touch I decided to create one more beach item (a starfish) and a sandy pedestal for my little fairy lighthouse ensemble. The starfish was created with a blend of Premo white and translucent,  it was hand sculpted, given color with inks of yellow and orange and given a treatment of texture using a firm brush.

The sandy pedestal was created with a blend of Premo white, translucent and rhino, which wasn't completely blended together to create a solid color, some streaks were left behind to give the feel of beach sand's varying colors. I gave a light dusting of the entire sand pedestal with macro pearl Pearl-ex powder (not easy to see in the photos), to mimic the shine of mica in the sand. I textured the faux sand with a crumpled up ball of tin foil, and indented areas for where the lighthouse should be placed, as well as indentations for where the sea glass stepping stones and whelk shell would be placed. All items of this little set are moveable for flexibility in decoration.


I am really pleased with my little fairy light house, and still in love with the idea of a beach fairy! But, this little piece is not something I need to keep for myself. The large whelk shell does beg me to keep it because it sculpted so easily and (I think) turned out so well), but I don't really want to break up the set. So, I believe this entire little set will find itself available for adoption in my createmyworld etsy shop within the next week or so... 


What do you think of my little fairy house? Please leave me a comment and tell me your thoughts! Voting for this challenge opens on August 1st (how can it be almost August already?!?). I will try to post a reminder here when the challenge is open for voting! Thanks for stopping by to check out my little fairy light house, and please consider leaving me a comment! :)

Sunday, August 25, 2013

Creation Story

There are many stories surrounding the creation of the world.  One in particular that struck me years ago is a Native American story about the world being created upon the back of a sea turtle.  I have no remembrance of where I first encountered that story and I've tried recently to find the exact story, but there seem to be many variations and each one I have found since are a little different from what I remember of the original myth.


I've been interested in Native American culture and stories since my college days.  I created my entire senior advanced drawing portfolio based on Native American art.  I think what initially drew me to reading the stories was an awareness and respect for the connection which Native tribes have to the earth.  So about 3 years ago when I was having dinner with 2 of my dad's sisters, imagine my surprise and delight to learn, for the first time, that one of my ancestors was Native American.  My aunts couldn't tell me much more than the fact that my dad's great grandmother was a full blooded Native American.  Considering the part of the country where my roots are planted, my great great grandmother's tribe must have been Lenni Lenape.


When my polymer clay guild, the Polymer Clay Artists Guild of Etsy (PCAGOE), decided to do a challenge theme inspired by a story or book, the turtle land creation story that I encountered many years ago was what I decided to depict.  Since I couldn't find the exact story, for those who would like to read something similar, here is a link to another version with the same basic premise.  I also found a similar Lenni Lenape version which was much more simplified... it goes:  Kishelemukong, the Creator, brought a turtle up from the ocean. 
It grew into an island (North America).  The first men and women sprouted from a tree on the tutle's back.


The piece of art you've seen in this post was created with this story in mind, as my entry for the September 2013 PCAGOE challenge.  I also had the idea to try to mimic quilled paper artwork.  The look I achieved is not quite what I had in mind, because it became much more complex than I had originally intended. The piece is meant as a wall hanging.  It was created by first stretching a piece of canvas over an wooden embroidery hoop.  I then sketched the design onto the canvas.  After painting the entire canvas with liquid polymer clay, which was then cured, I painted the canvas with inks.  The next step was to mix my polymer colors and extrude them all in long strips.  The strips were adhered to the canvas with a polymer bonding material and heat fused into place.  This was a painstaking process, taking much more time than I had originally anticipated.  The final step was to cover the wooden frame with more extruded strips of varying sizes.  I was quite pleased with the final outcome.  What do you think?


Voting will open on September 1st.  I'll be sure to blog about it to remind you to go vote for your favorite entries and to show you the entries from the other participating members!